資訊基礎應用:修訂版本之間的差異
出自六年制學程
(→path練習) |
(→同學作業) |
||
| (未顯示3位用戶所作出之89次版本) | |||
| 第 39 行: | 第 39 行: | ||
*第一份作業:本班通訊錄 | *第一份作業:本班通訊錄 | ||
*第二份作業:HTML 與 wiki 語法對照表 | *第二份作業:HTML 與 wiki 語法對照表 | ||
| − | *第三份作業:個人履歷,參考 http:// | + | *第三份作業:個人履歷,參考 http://jendo.org/~共用/丁禾履歷表.doc |
*表格邊框美化的範例一 | *表格邊框美化的範例一 | ||
<pre><table style='border:1px solid black;border-collapse:collapse;'> | <pre><table style='border:1px solid black;border-collapse:collapse;'> | ||
| 第 138 行: | 第 138 行: | ||
*#二維向量圖形格式。 | *#二維向量圖形格式。 | ||
*#由W3C制定,是開放標準。 | *#由W3C制定,是開放標準。 | ||
| − | *[http://jendo.org/~ | + | *[http://jendo.org/~thisNasAdmin/vs.php 看原始碼] |
| − | *#SVG空架子:[http://jendo.org/~ | + | *#SVG空架子:[http://jendo.org/~thisNasAdmin/base.svg http://jendo.org/~thisNasAdmin/base.svg] |
| − | *#多邊形:[http://jendo.org/~ | + | *#多邊形:[http://jendo.org/~thisNasAdmin/polygon.svg http://jendo.org/~thisNasAdmin/polygon.svg] |
| − | *#線性漸層:[http://jendo.org/~ | + | *#線性漸層:[http://jendo.org/~thisNasAdmin/linearGradient.svg http://jendo.org/~thisNasAdmin/linearGradient.svg] |
*#放射漸層: | *#放射漸層: | ||
| − | *#*[http://jendo.org/~ | + | *#*[http://jendo.org/~thisNasAdmin/ball1.svg http://jendo.org/~thisNasAdmin/ball1.svg] |
| − | *#*[http://jendo.org/~ | + | *#*[http://jendo.org/~thisNasAdmin/ball2.svg http://jendo.org/~thisNasAdmin/ball2.svg] |
| − | *#*[http://jendo.org/~ | + | *#*[http://jendo.org/~thisNasAdmin/ball3.svg http://jendo.org/~thisNasAdmin/ball3.svg] |
| − | *#文字:[http://jendo.org/~ | + | *#文字:[http://jendo.org/~thisNasAdmin/text.svg http://jendo.org/~thisNasAdmin/text.svg] |
| − | *#複製:[http://jendo.org/~ | + | *#複製:[http://jendo.org/~thisNasAdmin/flower3.svg http://jendo.org/~thisNasAdmin/flower3.svg] |
*在教學上應用的例子: | *在教學上應用的例子: | ||
*#[[能源與能量#能源與能量的區別|轉動的齒輪]] | *#[[能源與能量#能源與能量的區別|轉動的齒輪]] | ||
| 第 169 行: | 第 169 行: | ||
<circle cx='6' cy='6' r='4' style='fill:#fff;stroke:blue;stroke-width:2;fill-opacity:0'/> | <circle cx='6' cy='6' r='4' style='fill:#fff;stroke:blue;stroke-width:2;fill-opacity:0'/> | ||
</svg></pre> | </svg></pre> | ||
| − | *畫熊臉(bearFace.svg),如:[http://jendo.org/~ | + | *畫熊臉(bearFace.svg),如:[http://jendo.org/~thisNasAdmin/Shinycircle.svg 熊臉] |
*共同約定: | *共同約定: | ||
*#開始與結束合一。 | *#開始與結束合一。 | ||
| 第 206 行: | 第 206 行: | ||
===2017.11.7=== | ===2017.11.7=== | ||
====(一)畫文字==== | ====(一)畫文字==== | ||
| − | <img src='http://jendo.org/~ | + | <img src='http://jendo.org/~thisNasAdmin/text.svg' /> |
*範例一(text.svg)原始碼: | *範例一(text.svg)原始碼: | ||
<pre><?xml version='1.0' encoding='UTF-8' standalone='no'?> | <pre><?xml version='1.0' encoding='UTF-8' standalone='no'?> | ||
| 第 275 行: | 第 275 行: | ||
*作圖練習一:<img src=http://jendo.org/wiki1231/images/thumb/6/6f/Rtriangle.svg/250px-Rtriangle.svg.png width=150px> | *作圖練習一:<img src=http://jendo.org/wiki1231/images/thumb/6/6f/Rtriangle.svg/250px-Rtriangle.svg.png width=150px> | ||
| − | ====(二) | + | ====(二)位移、旋轉、縮放、歪斜==== |
| − | <img src='http://jendo.org/~ | + | <img src='http://jendo.org/~thisNasAdmin/transform.svg' /> |
*範例二(transform.svg)原始碼: | *範例二(transform.svg)原始碼: | ||
<pre><?xml version='1.0' encoding='UTF-8' standalone='no'?> | <pre><?xml version='1.0' encoding='UTF-8' standalone='no'?> | ||
| 第 285 行: | 第 285 行: | ||
<polygon points='0,0 5,-5 -12.5,0 5,5' style='stroke:#00f;fill:none;stroke-width:1pt;' transform='translate(75,50) rotate(90)'/> | <polygon points='0,0 5,-5 -12.5,0 5,5' style='stroke:#00f;fill:none;stroke-width:1pt;' transform='translate(75,50) rotate(90)'/> | ||
<polygon points='0,0 5,-5 -12.5,0 5,5' style='stroke:#f00;fill:none;stroke-width:1pt;' transform='translate(100,50) rotate(180) scale(0.8)'/> | <polygon points='0,0 5,-5 -12.5,0 5,5' style='stroke:#f00;fill:none;stroke-width:1pt;' transform='translate(100,50) rotate(180) scale(0.8)'/> | ||
| + | <polygon points='0,0 5,-5 -12.5,0 5,5' style='stroke:#f00;fill:none;stroke-width:1pt;' transform='translate(125,50) rotate(180) scale(0.8) skewX(30)'/> | ||
| + | <polygon points='0,0 5,-5 -12.5,0 5,5' style='stroke:#f00;fill:none;stroke-width:1pt;' transform='translate(150,50) rotate(180) scale(0.8) skewY(30)'/> | ||
</svg></pre> | </svg></pre> | ||
*注意: | *注意: | ||
| 第 293 行: | 第 295 行: | ||
*#旋轉變換(rotate):transform="rotate(angle cx,cy)"。angle代表旋轉角度,預設單位是「度」,順時針為正,逆時針為負。(cx,cy)是旋轉中心所在的坐標。若省略旋轉中心坐標,則預設值是(0,0)。 | *#旋轉變換(rotate):transform="rotate(angle cx,cy)"。angle代表旋轉角度,預設單位是「度」,順時針為正,逆時針為負。(cx,cy)是旋轉中心所在的坐標。若省略旋轉中心坐標,則預設值是(0,0)。 | ||
*#伸縮變換(scale):transform="scale(sx,sy)",sx,sy分別代表x軸方向和y方向拉伸或縮小的比例因子。拉伸:大於1;縮小:小於1。若省略sy,即sy=sx,作等比例縮放。 | *#伸縮變換(scale):transform="scale(sx,sy)",sx,sy分別代表x軸方向和y方向拉伸或縮小的比例因子。拉伸:大於1;縮小:小於1。若省略sy,即sy=sx,作等比例縮放。 | ||
| + | *#歪斜變換(skew):transform='skewX(x-angle)'或transform='skewY(y-angle)',x-angle,y-angle分別代表沿x軸和y軸歪斜的角度。 | ||
| + | <!--*#矩陣變換(matrix):transform='matrix(x伸縮.cos(a) sin(a)+Y歪斜tan(b) -sin(a)+X歪斜tan(c) y伸縮.cos(a) 位移x 位移y)',a 為旋轉角,b為Y歪斜角,c為X歪斜角。--> | ||
*作圖練習二(3petal0.svg)(三花瓣): | *作圖練習二(3petal0.svg)(三花瓣): | ||
<pre><?xml version='1.0' encoding='UTF-8' standalone='no'?> | <pre><?xml version='1.0' encoding='UTF-8' standalone='no'?> | ||
| 第 314 行: | 第 318 行: | ||
<pre><?xml version='1.0' encoding='UTF-8' standalone='no'?> | <pre><?xml version='1.0' encoding='UTF-8' standalone='no'?> | ||
<svg xmlns='http://www.w3.org/2000/svg' xmlns:xlink='http://www.w3.org/1999/xlink' version='1.1' width='600' height='600'> | <svg xmlns='http://www.w3.org/2000/svg' xmlns:xlink='http://www.w3.org/1999/xlink' version='1.1' width='600' height='600'> | ||
| − | <image xlink:href='http://jendo.org/~ | + | <image xlink:href='http://jendo.org/~thisNasAdmin/Image15.png' x='0' y='0' width='600' height='600'/> |
<g> | <g> | ||
<polygon points='100,100 120,20 100,0 80,20' style='stroke:none;stroke-width:0;fill:yellow;'/> | <polygon points='100,100 120,20 100,0 80,20' style='stroke:none;stroke-width:0;fill:yellow;'/> | ||
| 第 321 行: | 第 325 行: | ||
</g> | </g> | ||
</svg></pre> | </svg></pre> | ||
| + | |||
====(三)定義一次,引用多次==== | ====(三)定義一次,引用多次==== | ||
| − | <img src='http://jendo.org/~ | + | <img src='http://jendo.org/~thisNasAdmin/uses.svg' /> |
*範例三(uses.svg)原始碼: | *範例三(uses.svg)原始碼: | ||
<pre><?xml version='1.0' encoding='UTF-8' standalone='no'?> | <pre><?xml version='1.0' encoding='UTF-8' standalone='no'?> | ||
| 第 344 行: | 第 349 行: | ||
*#在 defs 段落中定義圖形,並賦予 id | *#在 defs 段落中定義圖形,並賦予 id | ||
*#用 <use xlink:href='#某id'/> 來引用既有的定義 | *#用 <use xlink:href='#某id'/> 來引用既有的定義 | ||
| − | *作圖練習三:<img src='http://jendo.org/~ | + | *作圖練習三:<img src='http://jendo.org/~thisNasAdmin/Image17.png' /> |
*參考: | *參考: | ||
| − | *#[http://jendo.org/~ | + | *#[http://jendo.org/~thisNasAdmin/flower0.svg 花] |
| − | *#[http://jendo.org/~ | + | *#[http://jendo.org/~thisNasAdmin/flower1.svg 花+笑臉] |
| − | *#[http://jendo.org/~ | + | *#[http://jendo.org/~thisNasAdmin/flower2.svg (花+笑臉)拉斜] |
| − | *#[http://jendo.org/~ | + | *#[http://jendo.org/~thisNasAdmin/flower3.svg 三朵花] |
===2017.11.14=== | ===2017.11.14=== | ||
漸層和濾鏡如果取中文名稱,瀏覽器還認得,但 Inkscape 和線上轉檔軟體就會不認得。 | 漸層和濾鏡如果取中文名稱,瀏覽器還認得,但 Inkscape 和線上轉檔軟體就會不認得。 | ||
====(四)線性漸層==== | ====(四)線性漸層==== | ||
| − | <img src='http://jendo.org/~ | + | <img src='http://jendo.org/~thisNasAdmin/linearGradient0.svg' /> |
| − | *範例四( | + | *範例四(linearGradient0.svg)原始碼: |
<pre><?xml version='1.0' encoding='UTF-8' standalone='no'?> | <pre><?xml version='1.0' encoding='UTF-8' standalone='no'?> | ||
<svg xmlns='http://www.w3.org/2000/svg' version='1.1' width='130' height='90'> | <svg xmlns='http://www.w3.org/2000/svg' version='1.1' width='130' height='90'> | ||
| 第 384 行: | 第 389 行: | ||
<polygon points='0,30 100,30 100,0 130,45 100,90 100,60 0,60' stroke='black' fill='none' /> | <polygon points='0,30 100,30 100,0 130,45 100,90 100,60 0,60' stroke='black' fill='none' /> | ||
</svg></pre> | </svg></pre> | ||
| + | |||
====(五)放射漸層==== | ====(五)放射漸層==== | ||
*三個範例及其原始碼: | *三個範例及其原始碼: | ||
| − | :ball1.svg <img src='http://jendo.org/~ | + | :ball1.svg <img src='http://jendo.org/~thisNasAdmin/ball1.svg' /> |
<pre><?xml version='1.0' encoding='UTF-8' standalone='no'?> | <pre><?xml version='1.0' encoding='UTF-8' standalone='no'?> | ||
<svg xmlns='http://www.w3.org/2000/svg' version='1.1' width='150' height='150'> | <svg xmlns='http://www.w3.org/2000/svg' version='1.1' width='150' height='150'> | ||
| 第 399 行: | 第 405 行: | ||
<circle cx='75' cy='75' r='75' fill='url(#r1)'/> | <circle cx='75' cy='75' r='75' fill='url(#r1)'/> | ||
</svg></pre> | </svg></pre> | ||
| − | :ball2.svg <img src='http://jendo.org/~ | + | :ball2.svg <img src='http://jendo.org/~thisNasAdmin/ball2.svg' /> |
<pre><?xml version='1.0' encoding='UTF-8' standalone='no'?> | <pre><?xml version='1.0' encoding='UTF-8' standalone='no'?> | ||
<svg xmlns='http://www.w3.org/2000/svg' version='1.1' width='150' height='150'> | <svg xmlns='http://www.w3.org/2000/svg' version='1.1' width='150' height='150'> | ||
| 第 412 行: | 第 418 行: | ||
<circle cx='75' cy='75' r='75' fill='url(#r2)'/> | <circle cx='75' cy='75' r='75' fill='url(#r2)'/> | ||
</svg></pre> | </svg></pre> | ||
| − | :ball3.svg <img src='http://jendo.org/~ | + | :ball3.svg <img src='http://jendo.org/~thisNasAdmin/ball3.svg' /> |
<pre><?xml version='1.0' encoding='UTF-8' standalone='no'?> | <pre><?xml version='1.0' encoding='UTF-8' standalone='no'?> | ||
<svg xmlns='http://www.w3.org/2000/svg' version='1.1' width='150' height='150'> | <svg xmlns='http://www.w3.org/2000/svg' version='1.1' width='150' height='150'> | ||
| 第 439 行: | 第 445 行: | ||
*#*stop-opacity 屬性決定透明度,也可以做為 style 的樣式。 | *#*stop-opacity 屬性決定透明度,也可以做為 style 的樣式。 | ||
*#以 ball3.svg 為例:漸層範圍為整個圓,因為 cx,cy,r 都是 50% ,而設色中心在中間下方,因為 fx='50%' fy='100%' ,此處是 stop 設為 0% 的顏色(白色),而範圍圓週邊是 stop 設為 100% 的顏色(黑色) | *#以 ball3.svg 為例:漸層範圍為整個圓,因為 cx,cy,r 都是 50% ,而設色中心在中間下方,因為 fx='50%' fy='100%' ,此處是 stop 設為 0% 的顏色(白色),而範圍圓週邊是 stop 設為 100% 的顏色(黑色) | ||
| − | *作圖練習五:以 SVG 放射漸層作出此圖:<img src='http://jendo.org/~ | + | *作圖練習五:以 SVG 放射漸層作出此圖:<img src='http://jendo.org/~thisNasAdmin/sun.png' width=100px /> ,圓半徑 75px 。 |
| + | |||
====(六)柔焦濾鏡==== | ====(六)柔焦濾鏡==== | ||
| − | <img src='http://jendo.org/~ | + | <img src='http://jendo.org/~thisNasAdmin/sun.svg' /> |
*範例六(sun.svg)原始碼: | *範例六(sun.svg)原始碼: | ||
<pre><?xml version='1.0' encoding='UTF-8' standalone='no'?> | <pre><?xml version='1.0' encoding='UTF-8' standalone='no'?> | ||
| 第 462 行: | 第 469 行: | ||
*#高斯模糊濾鏡 feGaussianBlur :濾鏡標籤包住數種不同效果的濾鏡,高斯模糊濾鏡是最簡單的濾鏡。 | *#高斯模糊濾鏡 feGaussianBlur :濾鏡標籤包住數種不同效果的濾鏡,高斯模糊濾鏡是最簡單的濾鏡。 | ||
*#高斯模糊濾鏡主要只有一個參數:stdDeviation(標準差),用來控制模糊的程度,數字越大越模糊,數字為零則是圖片原本的狀態。 | *#高斯模糊濾鏡主要只有一個參數:stdDeviation(標準差),用來控制模糊的程度,數字越大越模糊,數字為零則是圖片原本的狀態。 | ||
| − | *作圖練習六-1:加日。請到 jendo.org/~ | + | *作圖練習六-1:加日。請到 jendo.org/~thisNasAdmin/waterfall1.svg 複製原始碼到自己的www裡,將夕陽放到瀑布(waterfall1.svg)圖裡適當的位置,如右圖:<img src='http://jendo.org/~thisNasAdmin/waterfall1.png' width=150px align=right />,山要蓋住一部分柔焦的太陽。 |
| − | *作圖練習六-2:加天。以 SVG 漸層,柔焦作出夕陽圖如右圖:<img src='http://jendo.org/~ | + | *作圖練習六-2:加天。以 SVG 漸層,柔焦作出夕陽圖如右圖:<img src='http://jendo.org/~thisNasAdmin/waterfall2.png' width=150px align=right />,天用矩形做,天的顏色是下紫紅上藍,夕陽天色剛好在山的輪廓線之上。檔名叫做 waterfall2.svg 。 |
| − | *作圖練習六-3:加草地。以 SVG 漸層,柔焦作出夕陽圖如右圖:<img src='http://jendo.org/~ | + | *作圖練習六-3:加草地。以 SVG 漸層,柔焦作出夕陽圖如右圖:<img src='http://jendo.org/~thisNasAdmin/waterfall3.png' width=150px align=right /> 加入綠草地,是矩形,與天、山的左緣相接。檔名叫做 waterfall3.svg 。 |
| + | |||
===2017.11.21=== | ===2017.11.21=== | ||
path | path | ||
| 第 475 行: | 第 483 行: | ||
#四次:<img src='https://upload.wikimedia.org/wikipedia/commons/a/a4/B%C3%A9zier_4_big.gif' width='240px' height='*' /> <img src='https://upload.wikimedia.org/wikipedia/commons/b/bf/B%C3%A9zier_4_big.svg' width='240px' height='*' /> | #四次:<img src='https://upload.wikimedia.org/wikipedia/commons/a/a4/B%C3%A9zier_4_big.gif' width='240px' height='*' /> <img src='https://upload.wikimedia.org/wikipedia/commons/b/bf/B%C3%A9zier_4_big.svg' width='240px' height='*' /> | ||
#五次:<img src='https://upload.wikimedia.org/wikipedia/commons/0/0b/BezierCurve.gif' width='240px' height='*' /> | #五次:<img src='https://upload.wikimedia.org/wikipedia/commons/0/0b/BezierCurve.gif' width='240px' height='*' /> | ||
| + | |||
====path示範==== | ====path示範==== | ||
| − | #[http://jendo.org/~ | + | #[http://jendo.org/~thisNasAdmin/path1.svg 波浪] |
| − | #[http://jendo.org/~ | + | #[http://jendo.org/~thisNasAdmin/path2.svg 二,三次貝茲曲線] |
| − | #[http://jendo.org/~ | + | #[http://jendo.org/~thisNasAdmin/path3.svg 三次貝茲曲線軌跡] |
| − | #[http://jendo.org/~ | + | #[http://jendo.org/~thisNasAdmin/path4.svg 循跡字串(textPath子標籤)] |
| − | #[http://jendo.org/~ | + | #[http://jendo.org/~thisNasAdmin/path5.svg 簡易動畫(齒輪自轉)] |
| + | #[http://jendo.org/~thisNasAdmin/path6.svg 簡易動畫(齒輪自轉並前進)] | ||
| + | |||
====path練習==== | ====path練習==== | ||
#path01.svg 鋸子 | #path01.svg 鋸子 | ||
| 第 488 行: | 第 499 行: | ||
#path05.svg 簡易動畫 | #path05.svg 簡易動畫 | ||
====同學作業==== | ====同學作業==== | ||
| − | *張又懿:[http:// | + | *張又懿:[http://jendo.org/~張又懿/svg/path01.svg path01.svg],[http://jendo.org/~張又懿/svg/path02.svg path02.svg],[http://jendo.org/~張又懿/svg/path03.svg path03.svg],[http://jendo.org/~張又懿/svg/path04.svg path04.svg],[http://jendo.org/~張又懿/svg/path05.svg path05.svg] |
| − | * | + | *柯智懷:[http://jendo.org/~柯智懷/svg/path01.svg path01.svg],[http://jendo.org/~柯智懷/svg/path02.svg path02.svg],[http://jendo.org/~柯智懷/svg/path03.svg path03.svg],[http://jendo.org/~柯智懷/svg/path04.svg path04.svg],[http://jendo.org/~柯智懷/svg/path05.svg path05.svg] |
| − | * | + | *李彥廷:[http://jendo.org/~李彥廷/svg/path01.svg path01.svg],[http://jendo.org/~李彥廷/svg/path02.svg path02.svg],[http://jendo.org/~李彥廷/svg/path03.svg path03.svg],[http://jendo.org/~李彥廷/svg/path04.svg path04.svg],[http://jendo.org/~李彥廷/svg/path05.svg path05.svg] |
| − | *盧星瑜:[http:// | + | *盧星瑜:[http://jendo.org/~盧星瑜/svg/path01.svg path01.svg],[http://jendo.org/~盧星瑜/svg/path02.svg path02.svg],[http://jendo.org/~盧星瑜/svg/path03.svg path03.svg],[http://jendo.org/~盧星瑜/svg/path04.svg path04.svg],[http://jendo.org/~盧星瑜/svg/path05.svg path05.svg] |
| + | *張鈞祺:[http://jendo.org/~張鈞祺/svg/path01.svg path01.svg],[http://jendo.org/~張鈞祺/svg/path02.svg path02.svg],[http://jendo.org/~張鈞祺/svg/path03.svg path03.svg],[http://jendo.org/~張鈞祺/svg/path04.svg path04.svg],[http://jendo.org/~張鈞祺/svg/path05.svg path05.svg] | ||
| + | *蕭卉均:[http://jendo.org/~蕭卉均/SVG/path01.svg path01.svg],[http://jendo.org/~蕭卉均/SVG/path02.svg path02.svg],[http://jendo.org/~蕭卉均/SVG/path03.svg path03.svg],[http://jendo.org/~蕭卉均/SVG/path04.svg path04.svg],[http://jendo.org/~蕭卉均/SVG/path05.svg path05.svg] | ||
====動畫==== | ====動畫==== | ||
| 第 498 行: | 第 511 行: | ||
*[http://www.oxxostudio.tw/articles/201409/svg-22-smil-animation-2.html 深入理解 SMIL Animation] | *[http://www.oxxostudio.tw/articles/201409/svg-22-smil-animation-2.html 深入理解 SMIL Animation] | ||
*[https://waylau.com/svg-animation/ SVG 動畫示例] | *[https://waylau.com/svg-animation/ SVG 動畫示例] | ||
| + | *在「循跡運動」中,如果我們用 path 來表達移動路徑,則圖形的 0,0 其實是 path 開頭 M 所指示的位置,所以須以此關係來決定圖形的 x,y ,才能得到真正想要的運動軌跡。通常圖形的 x 會設為 0 , y 會設定為 ±圖形的高度 。 | ||
| + | |||
四標籤: | 四標籤: | ||
#set(開關) | #set(開關) | ||
| 第 523 行: | 第 538 行: | ||
*#path(animateMotion專用) 屬性為移動路徑:由 m 開始 | *#path(animateMotion專用) 屬性為移動路徑:由 m 開始 | ||
*#rotate='auto'(animateMotion專用) 圖形隨路徑曲度而轉折。 | *#rotate='auto'(animateMotion專用) 圖形隨路徑曲度而轉折。 | ||
| + | |||
| + | ===2017.11.28=== | ||
| + | inkscape(一) | ||
| + | *[http://201708.mediafire.com/file/k8307074ldnkrgd/InkscapePortable_0.92.4_azo.exe 0.92.4 下載連結] | ||
| + | *:32 位元:[https://inkscape.org/release/inkscape-0.92.4/windows/32-bit/exe/dl/ 安裝版] | [https://inkscape.org/release/inkscape-0.92.4/windows/32-bit/portable-app/dl/ 免安裝版 (可攜式)]<br/>64 位元:[https://inkscape.org/release/inkscape-0.92.4/windows/64-bit/exe/dl/ 安裝版] | ||
| + | *#查明自己的電腦是 64 位元版,還是 32 位元版。 | ||
| + | *#下載對應的免安裝版。 | ||
| + | *#解壓縮。 | ||
| + | *學習資源: | ||
| + | *#http://ppt.cc/VNkV 導向 google 文件 https://docs.google.com/document/d/1iwa3lrPhBVV_O8DpR96m1cmjBKIPZYbrjflpnngayBk/edit# | ||
| + | *#[http://sypswiki.dcs.tn.edu.tw/wiki/index.php?title=INKSCAPE_向量圖形 新營國小 Inkscape wiki頁] | ||
| + | *#[https://zh.wikibooks.org/zh-tw/Inkscape基本操作 中文維基教科書翻譯官網教學文件] | ||
| + | *#[https://ja.wikibooks.org/wiki/Inkscape/画面説明 日文維基教科書的畫面說明] | ||
| + | *素材: | ||
| + | *:介紹 .org 跟 .com 的差別,open source 和商業軟體的差別。 | ||
| + | *#介紹 openclipart.org | ||
| + | *#介紹 freepik.com 上面有很多 ai 檔,選「Vector/animals」,再選第一個圖,下載解壓縮。 | ||
| + | *#*下載 ai 檔,解散群組,取出猴子。 | ||
| + | *#*調整紙張,匯出點陣圖 | ||
| + | *作業一:找一隻動物,用 A4 紙彩印出來。 | ||
| + | *作業二:畫出一個矩形、一個弧、一個星形或多邊形。 | ||
| + | *作業三:畫出 <img src='http://jendo.org/~thisNasAdmin/TriceratopsHead.svg' /> | ||
| + | *工具箱: | ||
| + | <div class='tleft'><img src='https://upload.wikimedia.org/wikipedia/commons/3/30/Inkscape043_ToolBox.png' width='80' height='287'/></div> | ||
| + | :1:物件選用(F1) | ||
| + | :2:路徑/節點(F2) | ||
| + | :3:拉近/拉遠(F3) | ||
| + | :4:矩形和正方形(F4) | ||
| + | :5:圓/弧(F5) | ||
| + | :6:星型/多邊形 | ||
| + | :7:螺旋(F9) | ||
| + | :8:自由行手繪線(F6) | ||
| + | :9:貝茲線/直線 | ||
| + | :10:書法字畫線 | ||
| + | :11:文字(F8) | ||
| + | :12:創建一個新的連接器 | ||
| + | :13:創建和編輯漸變 | ||
| + | :14:吸管(F7) | ||
| + | *命令欄: | ||
| + | <img src='https://upload.wikimedia.org/wikipedia/commons/e/e9/Inkscape043_CommandBar.png' width='500' height='83' /> | ||
| + | :1:創建一個新文檔 | ||
| + | :2:打開現有的文件 | ||
| + | :3:保存文件 | ||
| + | :4:打印文件 | ||
| + | :5/6:匯入/匯出 | ||
| + | :7/8:復原/取消復原 | ||
| + | :9:複製到剪貼板 | ||
| + | :10:剪切到剪貼板 | ||
| + | :11:從剪貼板粘貼 | ||
| + | :12:放大以適應物體 | ||
| + | :13:根據窗口寬度進行縮放 | ||
| + | :14:縮放以適應頁面 | ||
| + | :15:重複的對象 | ||
| + | :16:創建一個對象的庫侖 | ||
| + | :17:取消原鏈接 | ||
| + | :18:分組選定的對象 | ||
| + | :19:取消選擇組 | ||
| + | :20:填充與邊框對話框 | ||
| + | :21:文本字體對話框 | ||
| + | :22:XML編輯器 | ||
| + | :23:排列/放置對話框 | ||
| + | :24:Inkscape設置 | ||
| + | :25:文檔設置 | ||
| + | |||
| + | ===2017.12.5=== | ||
| + | inkscape(二)操作要領 | ||
| + | *選單:工具盒(左)、命令欄(上)、選單圖示(右)、即時提示訊息(下),物件參數(上)、對話框 | ||
| + | *滑鼠: | ||
| + | *#確認你的操作工具<img src='http://jendo.org/files/6year/教學資源/資訊/SVG/inkscape_select.png' /> | ||
| + | *#點1下(奇數) vs 點2下(偶數)<br/><img src='http://jendo.org/files/6year/教學資源/資訊/SVG/inkscape_mouse.png' /> | ||
| + | *鍵盤 | ||
| + | <Table class='nicetable'> | ||
| + | <tr><th>指法</th><th>作用</th></tr> | ||
| + | <tr><td>Del</td><td>刪除物件</td></tr> | ||
| + | <tr><td>Home</td><td>物件升到最上層</td></tr> | ||
| + | <tr><td>End</td><td>物件降到最下層</td></tr> | ||
| + | <tr><td>Page-Up</td><td>物件升到上一層</td></tr> | ||
| + | <tr><td>Page-Down</td><td>物件降到下一層</td></tr> | ||
| + | <tr><td>Alt + 滑鼠點擊</td><td>在不同層的物件中跳動</td></tr> | ||
| + | <tr><td>Ctrl + B</td><td>顯/隱捲動條</td></tr> | ||
| + | <tr><td>Ctrl + 方向鍵</td><td>垂直/水平捲動畫布</td></tr> | ||
| + | <tr><td>Ctrl中鍵滾輪</td><td>拉近、拉遠</td></tr> | ||
| + | <tr><td>Shift中鍵滾輪</td><td>水平捲動畫布</td></tr> | ||
| + | <tr><td>Ctrl右鍵</td><td>拉近</td></tr> | ||
| + | <tr><td>Shift右鍵</td><td>拉遠</td></tr> | ||
| + | <tr><td>Ctrl + N</td><td>建新檔</td></tr> | ||
| + | <tr><td>Ctrl + O</td><td>開舊檔</td></tr> | ||
| + | <tr><td>Alt + Tab</td><td>檔案間切換</td></tr> | ||
| + | <tr><td>Ctrl + Z</td><td>回復上一步</td></tr> | ||
| + | <tr><td>Ctrl + Shift + Z</td><td>重做你上一個動作</td></tr> | ||
| + | <tr><td>F1~F9</td><td>工具箱中九個工具</td></tr> | ||
| + | <tr><td>F10</td><td>打開選單</td></tr> | ||
| + | <tr><td>F11</td><td>收放全螢幕</td></tr> | ||
| + | <tr><td>F12</td><td>收放對話框</td></tr> | ||
| + | <tr><td>Ctrl + Shift + F</td><td>叫用Fill and Stroke對話框</td></tr> | ||
| + | <tr><td>Ctrl + Shift + A</td><td>叫用「對齊」對話框</td></tr> | ||
| + | <tr><td>選物 + 方向鍵</td><td>移動2個像素(用Shift快10倍)</td></tr> | ||
| + | <tr><td>選物 + Alt + 方向鍵</td><td>移動1個像素</td></tr> | ||
| + | <tr><td>選物 + <和></td><td>中心點縮(50%)放(200%)</td></tr> | ||
| + | <tr><td>選物 + Alt + <和></td><td>微縮放</td></tr> | ||
| + | <tr><td>選物 + [和]</td><td>旋轉15度(加Ctrl一次轉90度)</td></tr> | ||
| + | <tr><td>選物 + Alt + [和]</td><td>微旋轉</td></tr> | ||
| + | <tr><td>Shift + 滑鼠點擊</td><td>選擇/排除選擇(配合範圍選擇)好幾個物件</td></tr> | ||
| + | <tr><td>Esc</td><td>取消全部選擇</td></tr> | ||
| + | <tr><td>Ctrl + A</td><td>選擇本圖層所有物件</td></tr> | ||
| + | <tr><td>Ctrl + G</td><td>建立群組</td></tr> | ||
| + | <tr><td>Ctrl + U</td><td>解散群組</td></tr> | ||
| + | <tr><td>Ctrl + Shift + G</td><td>解散群組</td></tr> | ||
| + | <tr><td>Ctrl + 滑鼠點擊</td><td>選用群組中的物件加以編輯</td></tr> | ||
| + | <tr><td>Ctrl + Shift + 滑鼠點擊</td><td>選用群組中的多個物件加以編輯</td></tr> | ||
| + | <tr><td>Ctrl+F1</td><td>漸層工具</td></tr> | ||
| + | <tr><td>F7</td><td>吸管</td></tr> | ||
| + | <tr><td>Ctrl + D</td><td>複製</td></tr> | ||
| + | </Table> | ||
| + | *作業四:[http://jendo.org/files/6year/教學資源/資訊/SVG/notebook.svg 記事本] | ||
| + | *作業五:[http://jendo.org/files/6year/教學資源/資訊/SVG/Lesson-2.svg Lesson-2.svg]中的變形,任選一至二個圖形 | ||
| + | |||
| + | ===2017.12.12=== | ||
| + | GIS(一) | ||
| + | |||
| + | GIS (Geographic Information System,地理資訊系統),是指在地圖上加上數據或訊息。 | ||
| + | ====概述==== | ||
| + | *使用地圖庫: | ||
| + | *#google map:google釋出的地圖庫,公布了API使得用戶能夠建立自訂的應用。公開格式,但非公共版權內容。 | ||
| + | *#OpenStreetMap:(開放街圖,簡稱OSM),於2004年由英國的 Steve Coast 發起,採用類似 Wiki 的協作編輯以及開放的授權與格式。 | ||
| + | * GIS 相關單字。 | ||
| + | *#zoom:放大或縮小畫面 | ||
| + | *#overlay:覆蓋物,GIS中用複數overlays | ||
| + | *#marker:標記,GIS中代表地點標示,用複數markers | ||
| + | *#address:地址 | ||
| + | *#latitude:緯度 | ||
| + | *#longitude:經度 | ||
| + | *#coord:經緯度座標,GIS中代表地點標示,用複數coords | ||
| + | *#map:地圖 | ||
| + | *#type:類別 | ||
| + | *#road:道路 | ||
| + | *#color:顏色 | ||
| + | *#fill:填滿 | ||
| + | *#radius:半徑 | ||
| + | *#html:超文件 | ||
| + | *#content:內容 | ||
| + | *#popup:跳出 | ||
| + | *#false:假的,不成立 | ||
| + | *#true:真的,成立 | ||
| + | *#polyline:多點成線 | ||
| + | *#polygon:多邊形 | ||
| + | *#circle:圓形 | ||
| + | *#rectangle:方形(矩形) | ||
| + | *#ROADMAP:道路地圖 | ||
| + | *#SATELLITE:衛星空照圖 | ||
| + | *#HYBRID:道路與空照圖相疊加。 | ||
| + | *#TERRAIN:地形圖 | ||
| + | *初階應用,大槪分為 markers (標點), overlays (標區域),使用的語法是 javascript 。 | ||
| + | *範例: | ||
| + | *#[http://jendo.org/~thisNasAdmin/Africa.html 非洲] | ||
| + | *#[http://jendo.org/~thisNasAdmin/America.html 美洲] | ||
| + | *#[http://jendo.org/~thisNasAdmin/Eurasia.html 歐亞大陸] | ||
| + | *#[http://jendo.org/~thisNasAdmin/Greece.html 希臘古戰場] | ||
| + | *#[http://jendo.org/~thisNasAdmin/以色列.html 以色列] | ||
| + | *#[http://jendo.org/~thisNasAdmin/中正山.html 境內行動學習] | ||
| + | *#[http://jendo.org/~thisNasAdmin/Chengdu.html 境外行動學習] | ||
| + | *#[http://jendo.org/~thisNasAdmin/丁丁家.html 住家] | ||
| + | *#[http://jendo.org/~thisNasAdmin/gismap0.html 範例總覽] | ||
| + | *#[http://jendo.org/~thisNasAdmin/gismap1.html 一點一區] | ||
| + | *#[http://jendo.org/~thisNasAdmin/markerDemo1.html 標點無連結] | ||
| + | *#[http://jendo.org/~thisNasAdmin/markerDemo2.html 標點加連結] | ||
| + | *基本 DIV | ||
| + | <pre> | ||
| + | <meta content='text/html;charset=utf-8' http-equiv='Content-Type'> | ||
| + | <script type='text/javascript' src='http://maps.google.com/maps/api/js?sensor=false'></script> | ||
| + | <script type='text/javascript' src='http://ajax.googleapis.com/ajax/libs/jquery/2.2.4/jquery.min.js'></script> | ||
| + | <script type='text/javascript' src='http://www.pittss.lv/jquery/gomap/js/jquery.gomap-1.3.3.min.js'></script> | ||
| + | <script> | ||
| + | $(function(){ | ||
| + | $('#map').goMap({ | ||
| + | ……… | ||
| + | }); | ||
| + | }); | ||
| + | </script> | ||
| + | <div align=center id='map' style='height:550px; width:900px;'>六年制學程</div></pre> | ||
| + | |||
| + | ====括號、引號必須成對==== | ||
| + | *所有字和符號都用「英數」、「半形」符號,不可以用全形符號。 | ||
| + | *所有的小括號、中括號、大括號、單引號、雙引號都要成對。 | ||
| + | *每一對大括號代表<u>一個東西</u>(物件),東西裡面可以包進去更小的東西,東西不一定要取名字。例如: | ||
| + | *#一張地圖。 | ||
| + | *#一個覆蓋物。 | ||
| + | *#一個經緯度座標點。 | ||
| + | *#一個地點標示。 | ||
| + | *#一個html指示。 | ||
| + | *每一對中括號裡面包<u>一群相同的東西</u>。例如: | ||
| + | *#一群 marker 包成一組,名字叫 markers ; | ||
| + | *#一群 overlay 包成一組,名字叫 overlays ; | ||
| + | *#一群 coord(經緯度座標)包成一組,名字叫 coords 。 | ||
| + | *每一對小括號中代表「函式」要作用的對象,現在先不必記它。 | ||
| + | |||
| + | ====整張圖的性質==== | ||
| + | #調整比例尺的性質:zoom:1~20。1比例尺最大,20比例尺最小。 | ||
| + | #標定整張地圖中心點位置的性質: | ||
| + | #*latitude:緯度,十進位。 | ||
| + | #*longitude:經度,十進位。 | ||
| + | #*address:地址。如:以色列。 | ||
| + | #地圖種類:maptype:值加引號有四種選擇: | ||
| + | #*ROADMAP:道路地圖 | ||
| + | #*SATELLITE:衛星空照圖 | ||
| + | #*HYBRID:道路與空照圖相疊加。 | ||
| + | #*TERRAIN:地形圖 | ||
| + | #markers:各個地點標示 | ||
| + | #overlays:各個覆蓋物 | ||
| + | |||
| + | ====標點==== | ||
| + | *性質的名稱和性質的「值」用「:」連接。 | ||
| + | *同一級或同一組的東西並列時,用「,」分開,但是最後一個性質或東西後面不可以加「,」,因為後面沒有東西了。 | ||
| + | *HTML 中的樣式語法有點像 GIS 中性質語法,但前者是用「;」間隔開兩組樣式,後者是用「,」間隔開兩組性質或東西。 | ||
| + | |||
| + | ====取得經緯度的方法==== | ||
| + | *android 上面必須使用 chrome 瀏覽器,不能使用預設瀏覽器。也不能使用地圖 app 。 | ||
| + | *#地圖上某一點按久一點,模擬滑鼠右鍵,出現下拉式選單,按下「這裡有什麼?」 | ||
| + | *網址使用 maps.google.com.tw?ui=maps 得到 ms 介面。 | ||
| + | *#ms介面可以到「地圖研究室」啟動「經緯標記」。 | ||
| + | *#長按地圖上一點,會跳出選單。選「標記經緯度」,可以標示經緯度。但標示點會偏,需要修正。 | ||
| + | *PC板只要使用滑鼠,而且不限瀏覽器。 | ||
| + | *#在要找的點,點擊滑鼠左鍵。就會出現該點的地址及經緯度。 | ||
| + | *#網址列如打出:「[https://www.google.com.tw/maps/@25.0246702,121.4566057,16z https://www.google.com.tw/maps/@25.0246702,121.4566057,16z]」可以指示圖中心點的經緯度及zoom的等級。 | ||
| + | ====作業==== | ||
| + | #去抄[http://jendo.org/~thisNasAdmin/markerDemo1.html 標點無連結]的原始碼回來,改成你家附近的地標。 | ||
| + | #為上述地標找到介紹頁。 | ||
| + | #將介紹頁的連結加到你的地標上。(參考[http://jendo.org/~thisNasAdmin/markerDemo1.html 標點加連結]) | ||
| + | #將圖示改成你找的小圖, svg,png,jpg,gif 皆可。 | ||
| + | #增加第二個地標。 | ||
| + | *張又懿:[http://jendo.org/~張又懿/gis2.html 張又懿] | ||
| + | *張鈞祺:[http://jendo.org/~張鈞祺/住家.html 張鈞祺] | ||
| + | *柯智懷:[http://jendo.org/~柯智懷/gis1.html 柯智懷] | ||
| + | *盧星瑜:[http://jendo.org/~盧星瑜/gis/gis1.html 盧星瑜] | ||
| + | *蕭卉均:[http://jendo.org/~蕭卉均/gis1.html 蕭卉均] | ||
| + | *李彥廷:[http://jendo.org/~李彥廷/gis1.html 李彥廷] | ||
| + | *劉國安:[http://jendo.org/~劉國安/GIS1.html 劉國安] | ||
| + | |||
| + | ===2017.12.19=== | ||
| + | GIS(二) | ||
| + | ====markers內參數==== | ||
| + | *整個markers:後面用一個中括號把所有的點包起來。中括號裡面,每一組大括號是一個點。 | ||
| + | *第一個 marker 為整張圖的中心點,優先於整張圖的中心點。 | ||
| + | *每一個點內,諸參數如下: | ||
| + | #address:值為字串,故加引號,可用國名如「台灣」或地址如「台灣新北市三峽區三樹路2號」 | ||
| + | #longitude:經度,十進位。如:121.459502 | ||
| + | #latitude:緯度,十進位。如:25.025448 | ||
| + | #html:放物件,內含: | ||
| + | #*content:HTML碼 | ||
| + | #*popup:false不主動彈出;true主動彈出。 | ||
| + | #title:游標停住會顯示。 | ||
| + | #draggable:true代表可拖動。 | ||
| + | #icon:字串,代表圖檔。 | ||
| + | ====overlays內參數==== | ||
| + | 每一個覆蓋物用大括號包起來,所有的覆蓋物用中括號包起來。 | ||
| + | |||
| + | 每一個覆蓋物共有的性質有:type、color、fillColor。 | ||
| + | |||
| + | 四種覆蓋物各自的參數: | ||
| + | #circle 圓:latitude、longitude、radius | ||
| + | #polyline 線:coords | ||
| + | #polygon 多邊形:coords | ||
| + | #rectangle 方形(矩形):ne、sw | ||
| + | |||
| + | ====作業==== | ||
| + | *將範例程式的圖中心點,改成自己家,路線圖改在自己家附近,圓圈圈住自己家。 | ||
| + | *做新的檔案,目標對準以色列,並用圓圈圈住死海。 | ||
| + | *在上一個檔案中,加入耶路撒冷、海法、台拉維夫三個城市的「地點標示」,點擊地點標示時,跳出連結,可以連向維基百科的介紹頁。 | ||
| + | *自訂主題,運用 GIS 幫助自己進行主題的說明與表達。 | ||
| + | |||
| + | ===2017.12.26=== | ||
| + | GIS(三) | ||
| + | ====google 我的地圖==== | ||
| + | *進入方法: | ||
| + | *#[https://www.google.com/maps/d/ https://www.google.com/maps/d/] 或 [https://www.google.com/maps/d/?hl=zh-TW https://www.google.com/maps/d/?hl=zh-TW] | ||
| + | *#「google 地圖選單/我的地點/地圖/建立地圖」 | ||
| + | *一圖多層: | ||
| + | *#觀摩丁丁的我的地圖 | ||
| + | *#[http://www.playpcesor.com/2016/03/google-maps-my-maps.html 操作講義] | ||
| + | *#存成 kml 檔 | ||
| + | *別人分享出來的地圖,以[https://maps.google.com/maps/ms?msa=0&msid=216006515222070930637.0004ccf5b0fba2ca5b9e6&hl=zh-TW&ie=UTF8&t=h&ll=24.945655,121.454673&spn=0.00681,0.00912&z=16&source=embed&dg=feature 台北郊山地圖]<br/>[http://jax-work-archive.blogspot.tw/2011/07/google-maps.html 中文參數說明]<br/>[http://asnsblues.blogspot.tw/2011/11/google-maps-query-string-parameters.html 英文參數說明] | ||
| + | *每一組參數與另一組參數用「&」相連 | ||
| + | *#mid=xxxxxxxxxx,如「216006515222070930637.0004ccf5b0fba2ca5b9e6」代表:「登山 - 台北郊山景點地圖」。 | ||
| + | *#hl=zh-TW,主機語言(host language) | ||
| + | *#ll=緯度,經度,地圖中心點經緯度(latitude,longitude)。 | ||
| + | *#z=縮放級數(zoom),值範圍1~20。1比例尺最大,20比例尺最小。<br/>-----其他參數----- | ||
| + | *#ie=UTF8:指定輸入的字符編碼(input encode)。 | ||
| + | *#oe=UTF8:指定輸出的字符編碼(output encode)。 | ||
| + | *#t=h:地圖類型(type)。m為常規地圖,k為衛星地圖,h為混合地圖,p為地形地圖,e為GoogleEarth。 | ||
| + | *#spn=0.00681,0.00912:大致的區域。如果沒有指縮放參數z=,那麼將調整縮放水平到一個合理的數值。 | ||
| + | *#source=embed:原始碼嵌入。 | ||
| + | *#dg=feature:自動產生,不必下命令。 | ||
| + | |||
| + | ====結合「我的地圖」與 GIS==== | ||
| + | *GIS←kml←google 我的地圖 | ||
| + | *什麼是 kml | ||
| + | *將 kml 中的經緯度,換成 GIS | ||
| + | *#將經緯度段落複製到一個新檔。 | ||
| + | *#將經緯度前的空白換成四個 tab | ||
| + | *#將「,0\n」置換成「}\n」 | ||
| + | *#將「\t\t\t\t」置換成「\t\t\t\t{longitude:」 | ||
| + | *#將「,」置換成「,latitude:」 | ||
| + | *#將「}」置換成「},」 | ||
| + | *置換後的經緯度座標,嵌入 GIS 的 polyline 裡的 coords:[]性質中。 | ||
| + | |||
| + | ===2018.1.2=== | ||
| + | 圖形計算機(一) | ||
| + | *製作 svgdraw.php | ||
| + | *#[http://6years.jendo.org/~丁志仁/svg/svgdraw.txt 抄原始碼(utf-8)] | ||
| + | *#在每個同學的 www 之下建 svg ,之下建 svgdraw.php ,內容抄上面。 | ||
| + | *#檔名自己取,副檔名用 php ,基本內容: | ||
| + | <pre><?php | ||
| + | require_once("./svgdraw.php"); | ||
| + | $draw = new svgdraw; | ||
| + | … | ||
| + | $drawResult=$draw->draw(); | ||
| + | echo $drawResult['svg']; | ||
| + | ?></pre> | ||
| + | *基本圖紙: | ||
| + | *#圖寬:$draw->W,預設601。 | ||
| + | *#圖高:$draw->H,預設401。 | ||
| + | *#原點距左上角:$draw->x0,$draw->y0,預設(200,200)。 | ||
| + | *#x每單位幾點:$draw->xu,預設15。 | ||
| + | *#y每單位幾點:$draw->yu,預設15。 | ||
| + | *#x每幾單位畫一個刻度:$draw->xGraduate,預設1。 | ||
| + | *#y每幾單位畫一個刻度:$draw->yGraduate,預設1。 | ||
| + | *#x每幾刻度標示一數字:$draw->xScale,預設1。 | ||
| + | *#y每幾刻度標示一數字:$draw->yScale,預設1。 | ||
| + | *#秀出直角座標系:$draw->coordinate,預設1。 | ||
| + | *#函式描點密度:$draw->pointDensity,預設20。 | ||
| + | *#函式取樣點:$draw->xs,預設'-1;0;1'; | ||
| + | *基本圖:$draw->圖形[]=array(array(…),其他屬性); | ||
| + | *#多邊形:$draw->polygons[]=array('points'=>array(array(×,×),array(×,×),array(×,×)),'width'=>'線寬'); | ||
| + | *#線段:$draw->lineSegments[]=array(array(×,×),array(×,×),'color'=>'顏色','dash'=>'5 5'); | ||
| + | *#字:$draw->alnums[]=array(array(×,×),'word'=>'字'); | ||
| + | *#圓:$draw->circles[]=array(array(×,×),'radius'=>半徑,'fill'=>'顏色','fill-opacity'=>'1');,預設半徑3。 | ||
| + | *#楕圓:$draw->ellipses[]=array(array(×,×),'rx'=>x半軸,'ry'=>y半軸,'color'=>'顏色'); | ||
| + | *#弧:$draw->arcs[]=array(array(×,×),array(×,×),'rx'=>x半軸,'ry'=>y半軸,'color'=>'顏色','arrowEnd'=>1); | ||
| + | *作業: | ||
| + | *#demo00.php 移動原點及尺寸 | ||
| + | *#demo01.php 三線段 | ||
| + | *#demo02.php 去直角座標 | ||
| + | *#demo02.svg 取原始碼 | ||
| + | *#demo03.php 45,45,90直角三角形,用polygons | ||
| + | *#demo03.svg 取原始碼 | ||
| + | *#demo04.php 對上面的三角形加入 A,B,C 三頂點 | ||
| + | *#demo04.svg 取原始碼 | ||
| + | *#inner.php 做三角形重心 | ||
| + | *#inner.svg 取原始碼 | ||
| + | *demo2.php | ||
| + | <pre><?php | ||
| + | require_once("./svgdraw.php"); | ||
| + | $draw = new svgdraw; | ||
| + | $draw->W=401; | ||
| + | $draw->functions[]=array('functionName'=>'polynomialEquation','argument'=>array(-3,4,2),'color'=>'red'); | ||
| + | $draw->ellipses[]=array(array(2,2),'rx'=>5,'ry'=>3,'color'=>'blue'); | ||
| + | $draw->arcs[]=array(array(3,3),array(5,3),'rx'=>5,'ry'=>5,'color'=>'green','arrowEnd'=>1); | ||
| + | #$draw->coordinate=0; | ||
| + | $drawResult=$draw->draw(); | ||
| + | echo $drawResult['svg']; | ||
| + | ?></pre> | ||
| + | |||
| + | ===2018.1.9=== | ||
| + | 圖形計算機(二) | ||
| + | *[http://6years.jendo.org/~丁志仁/svg/demo3.php demo3.php],同學自己做出來,不公布答案 | ||
| + | *多項式: | ||
| + | *#基本:<br/>$draw->functions[]=array('functionName'=>'polynomialEquation','argument'=>array(×,×,×,…),'color'=>'red'); | ||
| + | *#$draw->xs='×;×;×;…';:各點 x 值。 | ||
| + | *#標y值:在functions[]中加'xToy'=>$draw->xs, | ||
| + | *#標點:在functions[]中加'x2y'=>$draw->xs, | ||
| + | *#斜率:在functions[]中加'tangentPoint'=>$draw->xs, | ||
| + | *#面積:在functions[]中加'area'=>$draw->xs, | ||
| + | *[http://6years.jendo.org/~丁志仁/svg/polynomialEquationIn.php 互動式圖形計算機] | ||
| + | *[https://www.google.com.tw/search?q=1/((1-(x/300000)^2)^(1/2)),(1-(x/300000)^2)^(1/2) google圖形計算機] | ||
| + | |||
| + | ===2018.1.16與2018.1.23=== | ||
| + | *到自己筆記頁的討論頁去建立「完整筆記」。 | ||
| + | *參考「[[討論:資訊基礎應用|筆記架構]]」 | ||
| + | *採「壹、貳/一、二/(一)、(二)」分別代表兩個等號、三個等號、四個等號,兩個等號讓系統自動編碼。 | ||
| + | *各段落有提到重點,請儘量寫到。 | ||
| + | *將自己的練習放入筆記中當作例子。 | ||
| + | *連結寄到 丁志仁<alledu2@gmail.com> 。 | ||
| + | *可以自己加上各種附錄。 | ||
| + | *有問題可以問老師或助教。 | ||
| + | *可智懷要交這一份期末作業。 | ||
| + | *產出: | ||
| + | *本週如果可以寫完,下週可以不用來。 | ||
| + | *#[http://jendo.org/wiki1231/index.php?title=討論:資訊基礎應用/張又懿 張又懿] | ||
| + | *#[http://jendo.org/wiki1231/index.php?title=討論:資訊基礎應用/張鈞祺 張鈞祺] | ||
| + | *#[http://jendo.org/wiki1231/index.php?title=討論:資訊基礎應用/蕭卉均 蕭卉均] | ||
| + | *#[http://jendo.org/wiki1231/index.php?title=資訊基礎應用/盧星瑜 盧星瑜] | ||
| + | *#[http://jendo.org/wiki1231/index.php?title=資訊基礎應用/柯智懷 柯智懷] | ||
2021年11月3日 (三) 13:40的最新修訂版本
目錄
- 1 概述
- 2 各次上課內容
概述
一、課程目標
- 培養會使用 wiki,html,GIS,SVG 做事的人
- 協助全民科學平台的「動手做科學」活動上架
二、選修說明
- 修課同學:蕭卉均、李彥廷、張又懿(妹)、張鈞祺(兄)、黃柏實(子)、陳洹霈(母)、盧星瑜、紀詠恩、谌卫军(遠距學習)、吳文瀚(未到課)、吳亞蓁(未到課)
- 地點:新埔國中信義樓 517
- 時間:週二早上 9:15~12:00
- 費用:無
- 選課優先順位:有參與全民科學平台數位編輯意願者優先
- 教師:丁志仁
- 助教:柯智懷
- 上課規範:學員須自行攜帶筆電上課。上課注意聽,作業按時交。
- 成績以作業為主,通過者得 3 學分
三、課程內容組成
- 雲端空間使用
- 維基共享資源利用
- wiki,html 語法
- 點陣圖處理
- 向量圖處理(SVG)
- GIS
四、重要參考資料
- HTML入門
- wiki 語法
- 71個單字
| 英文 | 指令 | 中文 |
|---|---|---|
| hyper | html | 超 |
| text | html | 文字,文件 |
| markup | html | 標記 |
| language | html | 語言 |
| head | head | 頭 |
| title | title | 標題 |
| body | body | 身體 |
| anchor | a | 錨,超連結 |
| image | img | 圖 |
| paragraph | p | 段 |
| break | br | 斷 |
| space | space | 空間,空格 |
| horizontal | hr | 水平 |
| rule | hr | 線 |
| table | table | 表 |
| row | tr | 列 |
| diamond | td | 格 |
| order | ol | 有次序的 |
| unorder | ul | 沒有次序的 |
| list | ol;ul;li | 列表 |
| item | li | 項目 |
| style | style | 樣式(修飾一個超文件) |
| span | span | 文字小片段 |
| division | div | 區塊 |
| preserve | pre | 保留原有斷行及排列之式 |
| form | form | 表單 |
| source | src | 來源 |
| reference | href | 參考 |
| target | target | 目標 |
| blank | _blank | 空白 |
| width | width | 寬度 |
| height | height | 高度 |
| border | border | 邊界,邊框。 |
| font | font | 字體 |
| family | family | 字族,系 |
| size | size | 大小 |
| weight | weight | 輕重 |
| align | align | 對齊 |
| color | color | 顏色 |
| collapse | collapse | 崩塌 |
| html | html | 超文件 |
| content | content | 內容 |
| meta | meta | 對自身的描述 |
| http | http-equiv | 超文件傳輸協定 |
| equiv | http-equiv | 約當 |
| Character | charset | 字元 |
| set | charset | 集合 |
| alternative | alt | 替代的 |
| identy | id | 惟一的身份表示法 |
| background | background | 背景 |
| back | background | 背 |
| ground | background | 地面、引申為基礎的 |
| none | none | 沒有 |
| margin | margin | 邊 |
| padding | padding | 填充,框到框內圖文的距離 |
| pad | pad | 墊、便箋本 |
| clear | clear | 清乾淨 |
| position | position | 位置 |
| absolute | absolute | 絕對 |
| relative | relative | 相對的 |
| index | index | 指標 |
| left | left | 左 |
| center | center | 中 |
| right | right | 右 |
| top | top | 上 |
| middle | middle | 中 |
| bottom | bottom | 下(底) |
| button | button | 按鈕、按鍵 |
| class | class | 類別 |
| URL | URL | 網路資源的位置 |
| script | script | 腳本 |
各次上課內容
2017.9.5
- 工具與環境,看見伺服器與VDSL
- 區網 wifi :jendod與jendoa,密碼現場說明
- 伺服器 DS216,網址 6years.jendo.org
- 調整 C:\Windows\System32\drivers\etc\hosts,新增一行「192.168.4.2 6years.jendo.org」,下課前註解掉
- 瀏覽器:firefox 優先於 chrome ,避免使用 IE
- filezilla
- 打開 filezilla ,並新增一個站台叫「DS216+(共用)」
- 上述站台的設為:
- 主機:6years.jendo.org;
- 協定:SFTP
- 使用者:共用
- 密碼:
- 字碼集:UTF-8
- 連線,然後到「/home/www」
- 關閉 filezilla 。
- 建自己帳號的連線
- 可用的文字編輯器,如 emeditor
- 連結 filezilla 和慣用的文字編輯器:「編輯/設定/檔案編輯」,選用「使用自訂編輯器」與「總是使用預設的編輯器」,並指定編輯器的路徑。
2017.9.12
- 建造每一個人的筆記頁:「資訊基礎應用/○○○」,要登入才有辦法編寫
- 其中須有一段,列出已記得的單字,老師沒列到的單字要跟丁丁講
- 第一份作業:本班通訊錄
- 第二份作業:HTML 與 wiki 語法對照表
- 第三份作業:個人履歷,參考 http://jendo.org/~共用/丁禾履歷表.doc
- 表格邊框美化的範例一
<table style='border:1px solid black;border-collapse:collapse;'>
<tr><th style='border:1px solid black;border-collapse:collapse;'>一</th><td style='border:1px solid black;border-collapse:collapse;'>三</td></tr>
<tr><th style='border:1px solid black;border-collapse:collapse;'>二</th><td style='border:1px solid black;border-collapse:collapse;'>四</td></tr>
</table>
- 表格邊框美化的範例二
<style>
.nicetable {border:1px solid black;border-collapse:collapse;}
</style>
<table class='nicetable'>
<tr><th class='nicetable'>一</th><td class='nicetable'>三</td></tr>
<tr><th class='nicetable'>二</th><td class='nicetable'>四</td></tr>
</table>
2017.9.19
- 交代樣式(外觀)的三種方式:
- 行內:
- 通篇:
- 跨多篇:
<link rel='stylesheet' type='text/css' href='./pa.css' />
- 樣式作用的三種對象:
- 標籤:
- 類別(class):
- 指定專一的標籤(id):
- 多條件交代樣式的作用對象:
2017.9.26
- 筆記中建立 wiki 與 HTML 對照表
- 等號
- 星號
- 井號
- 中括號(連結)
- 雙層中括號(圖照)
- 文字的拉斜與加粗
- 冒號及分號
- 水平線
- 角括號的寫法:
- <:<
- >:>
- 表格的示例
- Mediawiki_簡介
- 柏納李發明 html 及 http 。
- 由HTML速記到共筆再到維基百科。
- 分享式合作與共享經濟
- CC授權
- Wiki_基本語法與條目發展
- 取用圖照:
- 找到 google 翻譯,找出食人魚的英文。
- 由 google 找到「維資基共享源」的網址「commons.wikimedia.org」
- 到「維資基共享源」在蒐尋框蒐「File:Piranha」
- 開一張食人魚的圖,了解頁中各種尺寸的連結,並選擇想要的尺寸。
- 用雙層中括號將圖照帶入 wiki 頁
- 用 img 標籤帶入 wiki 頁
- 比照兩的速度有何不同
- 找到食人魚的分類「Category:Pygocentrus nattereri」
- 由 google 的照片蒐尋,使用「工具/使用權限」來找到可以用的圖。
- 蒐「File:Piranha svg」,並看 svg 檔無段放大不毛邊的效果。
- 看 svg 圖檔的原始碼,知道它是由指示組成。
- 圖檔格式(點陣與向量),SVG特性,著作權保護期的長短。
- 由蒐「file:animal cell svg」說明 svg 檔可輕易改作。但仍要尊重原作者的貢獻。
2017.10.03
- 下載 http://6years.jendo.org/~共用/丁禾履歷表.doc
- 以 word 打開
- 找到「尺規」開關並打開
- 取消「檔案/選項/進階/顯示字元寬度單位」核取方塊
- 找出長寬
- 每 inch 2.54公分,72pt
- 開「履歷表.html」
- 頁
- 在樣式定義中以「@page 某值{…}」設定 css
- 在顯示區中以「<div style='page:某值;'>」
- 可用的定義:
- size:寬 長;
- margin:天 右 地 左
- mso-page-orientation:landscape 橫放
- mso-header-margin:頁首大小
- mso-footer-margin:頁尾大小
- 跳頁的用法:「<br style='page-break-before:always' />」
- 表格寬度用「style='width:xxx'」表達寬度,xxx可以用百分比、公分、pt、無單位數字,無單位數字由「控制台/顯示器/設定/一般/字型大小」控制,如96dpi(100%)則96個寬度單位為1英吋;120dpi(125%)則120個寬度單位為1英吋。
- 表格高度在 tr 中設,
- <tr style='height:數字'/>時無單位數字、cm、pt三種單位均有效,百分比無效。
- <tr height=數字/>只對無單位數字有效。
- 圖的寬度:
- style='width:數字;height:數字;' 對無單位、百分比、pt、cm 皆無效
- width=數字 height=數字 對百分比、pt、cm 皆無效,對無單位有效,但不可使用auto。無單位長度定義同上段。
2017.10.17
- 去看 http://6years.jendo.org/~共用/履歷表.html
- 用 filezilla 下載回來
- 以 word 打開,看完之後,關閉此檔
- 用 emeditor 打開下載檔案
- 解說 xml (Extensible Markup Language)
- 解說 xmlns (xml namespace)
- 看HTML/適應word
- 仿做自己的履歷表
2017.10.24
- Scalable Vector Graphics(可縮放向量圖形)
- 特性
- XML語法。
- 二維向量圖形格式。
- 由W3C制定,是開放標準。
- 看原始碼
- 在教學上應用的例子:
- 圖檔寫法:
<?xml version='1.0' encoding='UTF-8' standalone='no'?>
<svg xmlns='http://www.w3.org/2000/svg' version='1.1' width='130' height='90'>

</svg>
- HTML寫法:
<svg>

</svg>
- 畫一個小圓圈:
<?xml version='1.0' encoding='UTF-8' standalone='no'?>
<svg xmlns='http://www.w3.org/2000/svg' version='1.1' width='12' height='12'>
  <circle cx='6' cy='6' r='4' style='fill:#fff;stroke:blue;stroke-width:2;fill-opacity:0'/>
</svg>
- 畫熊臉(bearFace.svg),如:熊臉
- 共同約定:
- 開始與結束合一。
- 長度如省略單位,預設單位為 px。
- px可以使用小數點。
- 以左上為座標原點。
- 座標描述先 x 後 y 。
- stlye屬性中關於線條之樣式,也可以作為繪圖:
- stroke (線條顏色),
- stroke-width (線條寬度),
- stroke-opacity (線條顏色的透明度,合法的範圍是:0 - 1,0最透明,預設1),
- stroke-linecap (線條端點形狀,預設butt端點切齊、round以端點為圓心線寬為直徑畫圓、square以端點為中心線寬為邊長畫方形),
- stroke-linejoin (線條轉彎處樣式,預設miter尖角、round圓角、bevel斜角),
- stroke-miterlimit (尖角內外距/線寬的最大值,不設限則尖角可以拉長至無限長,預設為 4 倍),
- stroke-dasharray (預設none,代表實線。若為數字其值為一陣列,陣列值為線段中實線段長度與虛線段長度的交錯數字,通常是兩個數字一組,如果是奇數,則最後面自動加補第一個數字)
- stlye屬性中關於面之樣式:
- fill (填充顏色),
- fill-opacity (填充不透明,合法的範圍是:0 - 1,0最透明,預設1)。
- fill-rule (polygon等標籤有時會將內部分割成不同的區域,填色方式,預設nonzero全部同色、evenodd相鄰區域內部填色與外部填色交互填充、inherit繼承)
- 選擇器 class,id 同 CSS 。
- 常見的簡易繪圖標籤:
- line(直線),屬性有x1(第一點x座標)y1(第一點y座標)x2(第二點x座標)y2(第二點y座標)。
- polyline(多點成線),諸屬性如下:
- points:多點,點與點用空白間開,同一點 x y 座標以逗點間開。
- polygon(多邊形),也可以取五點畫出一個星形。諸屬性如下:
- points:多點,點與點用空白間開,同一點 x y 座標以逗點間開。
- circle(圓),諸屬性如下:
- cx(圓心x座標),cy(圓心y座標),r(半徑)
- rect(矩形),諸屬性如下:
- width(寬),height(高),省略起點則以原點為起點,x(起點x座標),y(起點y座標),rx(圓角x半徑),ry(圓角y半徑)
- ellipse(楕圓),諸屬性如下:
- cx(中心x座標),cy(中心x座標),rx(x軸半長),ry(y軸半長)。
2017.10.31
因老師父親骨折而停課
2017.11.7
(一)畫文字
- 範例一(text.svg)原始碼:
<?xml version='1.0' encoding='UTF-8' standalone='no'?>
<svg xmlns='http://www.w3.org/2000/svg' version='1.1' width='130' height='90'>
	<text x='40' y='50' style='font-family:kaiti;fill:#666666'>羅馬</text>
</svg>
- 在「text」標籤開始與結束之間夾字,可用中英文。而使用「屬性」來規定文字的表現,所有的屬性都可以改用樣式來表達。
- 可用中文字形:
- Monospace:等寬字型(非調和字)
- Sans:無襯線體(黑體,哥德體)
- Serif:襯線體(筆畫末端的裝飾細節,白體,羅馬體)
- KaiTi:楷體
- MingLiU:明體
- PMingLiU:明體
- MingLiU_HKSCS:明體
- FangSong:仿宋
- NSimSun:新宋
- SimHei:新黑
- Microsoft YaHei:微軟雅黑體
- Microsoft JhengHei:微軟正黑體
- Arial Unicode MS:微軟 Arial 體
- DFBiaoKaiShu-B5:華康楷書體
- DFHKStdKai-B5:華康標楷體
- DFHKStdSong-B5:華康標宋體
- DFBiaoSong-B5:華康宋體
- DFHeiUBlod-B5:華康特粗黑體
- DFHeiBlod-B5:華康粗黑體
- DFHeiMedium-B5:華康中黑體
- DFHeiLight-B5:華康細黑體
- DFBiaoKaiShu-B5:華康楷書體
- …:華康眾字體,族繁不及備載
- Segoe UI:微軟 Segoe UI 字形
- Tahoma:微軟 Tahoma 字形
- Meiruo:日文明瞭體
- Meiruo UI:日文明瞭體
- MS Gothic:微軟日文哥德體
- MS Mincho:微軟日文明朝體
- MS PGothic:微軟日文哥德體
- MS PMincho:微軟日文明朝體
- MS UI Gothic:微軟日文哥德體
- MS Mincho:微軟日文明朝體
- 屬性 x 和 y 標示字的起點:值可為'10,20,30,40',表示每個字的 x 或 y 座標。
- 屬性 dx 和 dy 基於前一個字的位置去做變化:值可為'10,20,30,40',字的距離一個比一個更遠。
- 屬性 fill 控制填入字的顏色,預設黑色
- 屬性 stroke 控制字描框的顏色,預設 none
- 屬性 rotate='30' 順時鐘轉30°。rotate='30,60,90,120,150,180,210'指定每個字的轉動角度。
- 用 style 控制字體、字形、尺寸,但顏色是用 fill 不是用 color 。
其他進階屬性:
- text-decoration 屬性,有以下諸值:
- underline:底線
- overline:頂線
- line-through:刪除線
- blink:閃爍
- none:無,預設值
- inherit:繼承
- textLength 及 lengthAdjust ,前者設定字串的總長度,後者設定要怎麼湊到這個長度,有兩個值:
- lengthAdjust='spacing' 靠調整字距來湊足字串的長度。
- lengthAdjust='spacingAndGlyphs' 靠把字拉胖來湊足字串的長度。
- 子標籤 TSPAN:就是 span ,其屬性值幾乎和 text 一模一樣,也是 x、y、dx、dy、rotate、textLength。
- 子標籤 textPath:屬性 xlink:href='#path的id' ;屬性 startOffset='xx%' 從 path 的百分之多少開始跑字。path 在 def 中定義,含路徑、填充色、畫框色。
- 屬性 style 控制諸樣式:
- font-size:
- writing-mode:tb;直寫,預設橫寫
- 作圖練習一:

(二)位移、旋轉、縮放、歪斜
- 範例二(transform.svg)原始碼:
<?xml version='1.0' encoding='UTF-8' standalone='no'?>
<svg height='100' width='112.5' xmlns='http://www.w3.org/2000/svg' version='1.1'>
	<line x1='0' y1='50' x2='113' y2='50' style='stroke:#0f0;stroke-dasharray:2 2;stroke-width:0.5pt;' />
	<polygon points='0,0 5,-5 -12.5,0 5,5' style='stroke:#000;fill:none;stroke-width:1pt;' transform='translate(25,50)'/>
	<polygon points='0,0 5,-5 -12.5,0 5,5' style='stroke:#00f;fill:none;stroke-width:1pt;' transform='rotate(90) translate(50,-50)'/>
	<polygon points='0,0 5,-5 -12.5,0 5,5' style='stroke:#00f;fill:none;stroke-width:1pt;' transform='translate(75,50) rotate(90)'/>
	<polygon points='0,0 5,-5 -12.5,0 5,5' style='stroke:#f00;fill:none;stroke-width:1pt;' transform='translate(100,50) rotate(180) scale(0.8)'/>
	<polygon points='0,0 5,-5 -12.5,0 5,5' style='stroke:#f00;fill:none;stroke-width:1pt;' transform='translate(125,50) rotate(180) scale(0.8) skewX(30)'/>
	<polygon points='0,0 5,-5 -12.5,0 5,5' style='stroke:#f00;fill:none;stroke-width:1pt;' transform='translate(150,50) rotate(180) scale(0.8) skewY(30)'/>
</svg>
- 注意:
- 四個圖形都圍繞凹尖處旋轉,此點是原始圖形的(0,0)點。因為 rotate 都只交代角度,沒有交代繞著哪個中心旋轉,所以就繞預設值(0,0)旋轉。
- 如果混合兩種以上操作,請先平移、再旋轉、再縮放。請看第二個箭頭(藍色),先旋轉再平移,結果他的平移座標,是旋轉過後的 x 軸和 y 軸,不再是預設的 x 軸和 y 軸。
- 相關屬性說明:
- 平移變換(translate):transform="translate(x,y)",即新坐標系的原點在原坐標系的(x,y)處。坐標軸的方向不變。
- 旋轉變換(rotate):transform="rotate(angle cx,cy)"。angle代表旋轉角度,預設單位是「度」,順時針為正,逆時針為負。(cx,cy)是旋轉中心所在的坐標。若省略旋轉中心坐標,則預設值是(0,0)。
- 伸縮變換(scale):transform="scale(sx,sy)",sx,sy分別代表x軸方向和y方向拉伸或縮小的比例因子。拉伸:大於1;縮小:小於1。若省略sy,即sy=sx,作等比例縮放。
- 歪斜變換(skew):transform='skewX(x-angle)'或transform='skewY(y-angle)',x-angle,y-angle分別代表沿x軸和y軸歪斜的角度。
- 作圖練習二(3petal0.svg)(三花瓣):
<?xml version='1.0' encoding='UTF-8' standalone='no'?>
<svg xmlns='http://www.w3.org/2000/svg' version='1.1' width='600' height='600'>
<g>
<polygon points='100,100 120,20 100,0 80,20' style='stroke:none;stroke-width:0;fill:yellow;'/>
<polygon points='100,100 120,20 100,0 80,20' style='stroke:none;stroke-width:0;fill:yellow;' transform='rotate(45 100 100)'/>
<polygon points='100,100 120,20 100,0 80,20' style='stroke:none;stroke-width:0;fill:yellow;' transform='rotate(90 100 100)'/>
</g>
</svg>
- 綁成群組(3petal1.svg):
<?xml version='1.0' encoding='UTF-8' standalone='no'?>
<svg xmlns='http://www.w3.org/2000/svg' xmlns:xlink='http://www.w3.org/1999/xlink' version='1.1' width='600' height='600'>
<g transform='translate(300,48) rotate(30) scale(1.7)'>
<polygon points='100,100 120,20 100,0 80,20' style='stroke:none;stroke-width:0;fill:yellow;'/>
<polygon points='100,100 120,20 100,0 80,20' style='stroke:none;stroke-width:0;fill:yellow;' transform='rotate(45 100 100)'/>
<polygon points='100,100 120,20 100,0 80,20' style='stroke:none;stroke-width:0;fill:yellow;' transform='rotate(90 100 100)'/>
</g>
</svg>
- 墊一張圖(3petal2.svg):
<?xml version='1.0' encoding='UTF-8' standalone='no'?>
<svg xmlns='http://www.w3.org/2000/svg' xmlns:xlink='http://www.w3.org/1999/xlink' version='1.1' width='600' height='600'>
<image xlink:href='http://jendo.org/~thisNasAdmin/Image15.png' x='0' y='0' width='600' height='600'/>
<g>
<polygon points='100,100 120,20 100,0 80,20' style='stroke:none;stroke-width:0;fill:yellow;'/>
<polygon points='100,100 120,20 100,0 80,20' style='stroke:none;stroke-width:0;fill:yellow;' transform='rotate(45 100 100)'/>
<polygon points='100,100 120,20 100,0 80,20' style='stroke:none;stroke-width:0;fill:yellow;' transform='rotate(90 100 100)'/>
</g>
</svg>
(三)定義一次,引用多次
- 範例三(uses.svg)原始碼:
<?xml version='1.0' encoding='UTF-8' standalone='no'?>
<svg xmlns='http://www.w3.org/2000/svg' xmlns:xlink='http://www.w3.org/1999/xlink' version='1.1' width='201' height='201'>
<defs>
	<polygon id='petal' points='100,100 120,20 100,0 80,20' style='stroke:none;stroke-width:0;fill:yellow;'/>
</defs>
<g>
<use xlink:href='#petal'/>
<use xlink:href='#petal' transform='rotate(45 100 100)'/>
<use xlink:href='#petal' transform='rotate(90 100 100)'/>
<use xlink:href='#petal' transform='rotate(135 100 100)'/>
<use xlink:href='#petal' transform='rotate(180 100 100)'/>
<use xlink:href='#petal' transform='rotate(225 100 100)'/>
<use xlink:href='#petal' transform='rotate(270 100 100)'/>
<use xlink:href='#petal' transform='rotate(315 100 100)'/>
</g>
</svg>
- 步驟:
- 先添加 svg 標籤的屬性:xmlns:xlink='http://www.w3.org/1999/xlink',其中才有 href 屬性的定義
- 在 defs 段落中定義圖形,並賦予 id
- 用 <use xlink:href='#某id'/> 來引用既有的定義
- 作圖練習三:

- 參考:
2017.11.14
漸層和濾鏡如果取中文名稱,瀏覽器還認得,但 Inkscape 和線上轉檔軟體就會不認得。
(四)線性漸層
- 範例四(linearGradient0.svg)原始碼:
<?xml version='1.0' encoding='UTF-8' standalone='no'?>
<svg xmlns='http://www.w3.org/2000/svg' version='1.1' width='130' height='90'>
<defs>
	<linearGradient id='LG' x1='30%' y1='0%' x2='70%' y2='0%'>
		<stop offset='0%' style='stop-color:#ffff00;stop-opacity:1' />
		<stop offset='100%' style='stop-color:#ff0000;stop-opacity:1' />
	</linearGradient>
</defs>
<rect width='130' height='90' x='0' y='0' stroke='red' fill='url(#LG)' />
</svg>
- 步驟:
- 不用添加 svg 標籤的屬性:xmlns:xlink='http://www.w3.org/1999/xlink',不會用到 href 屬性
- 在 defs 段落中定義漸層,並賦予 id
- 用 fill='url(#某id)' 屬性來引用既有的漸層定義
- linearGradient 線性漸層定義語法說明:
- 漸層標籤中的 100%,指的是整個圖形
- 其中的 id 屬性定出漸層名稱
- 由 x1,y1,x2,y2 四個屬性決定漸層範圍,以及水平,垂直或角形漸層,四個屬性都以百分比表示:
- x1,y1,x2,y2 屬性決定漸層開始和結束位置,x1,x2以圖形的寬度為準,y1,y2以圖形的高度為準
- 當 y1 和 y2 相等,而 x1 和 x2 不同時,可創建水平漸層
- 當 x1 和 x2 相等,而 y1 和 y2 不同時,可創建垂直漸層
- 當 x1 和 x2 不同,且 y1 和 y2 不同時,可創建角形漸層
- 作圖練習四-1:做h.svg、v.svg兩個檔案,在h.svg裡做長寬各100px,由左到右、黃到紅的漸層;在v.svg裡長寬各100px,由上到下、藍到綠的漸層。
- 作圖練習四-2:參考箭頭(arrow.svg)的原始碼,做一個arrowUp.svg檔,做出寬:90、高:130,由上到下,白到紫色漸層的⇧。 arrow.svg 的原始碼如下:
<?xml version='1.0' encoding='UTF-8' standalone='no'?>
<svg xmlns='http://www.w3.org/2000/svg' version='1.1' width='130' height='90'>
	<polygon points='0,30 100,30 100,0 130,45 100,90 100,60 0,60' stroke='black' fill='none' />
</svg>
(五)放射漸層
- 三個範例及其原始碼:
- ball1.svg
<?xml version='1.0' encoding='UTF-8' standalone='no'?>
<svg xmlns='http://www.w3.org/2000/svg' version='1.1' width='150' height='150'>
<defs>
	<radialGradient id='r1' cx='30%' cy='30%' r='70%'>
		<stop offset='0%' stop-color='#fff'></stop>
		<stop offset='30%' stop-color='#9f9'></stop>
		<stop offset='70%' stop-color='#373'></stop>
		<stop offset='100%' stop-color='#000'></stop>
	</radialGradient>
</defs>
<circle cx='75' cy='75' r='75' fill='url(#r1)'/>
</svg>
- ball2.svg
<?xml version='1.0' encoding='UTF-8' standalone='no'?>
<svg xmlns='http://www.w3.org/2000/svg' version='1.1' width='150' height='150'>
<defs>
	<radialGradient id='r2' cx='50%' cy='50%' r='50%'>
		<stop offset='0%' stop-color='#fff'></stop>
		<stop offset='30%' stop-color='#9f9'></stop>
		<stop offset='70%' stop-color='#373'></stop>
		<stop offset='100%' stop-color='#000'></stop>
	</radialGradient>
</defs>
<circle cx='75' cy='75' r='75' fill='url(#r2)'/>
</svg>
- ball3.svg
<?xml version='1.0' encoding='UTF-8' standalone='no'?>
<svg xmlns='http://www.w3.org/2000/svg' version='1.1' width='150' height='150'>
<defs>
	<radialGradient id='r3' cx='50%' cy='50%' r='50%' fx='50%' fy='100%'>
		<stop offset='0%' stop-color='#fff' opacity='0'></stop>
		<stop offset='30%' stop-color='#9f9' opacity='0'></stop>
		<stop offset='70%' stop-color='#373' opacity='0'></stop>
		<stop offset='100%' stop-color='#000' opacity='0'></stop>
	</radialGradient>
</defs>
<circle cx='75' cy='75' r='75' fill='url(#r3)'/>
</svg>
- radialGradient 放設漸層定義語法說明:
- 漸層範圍:由 cx,cy,r 三個屬性決定,三個屬性都以百分比表示,漸層範圍是一個圓或橢圓
- cx 表示範圍中心在圖寬百分之幾的位置
- cy 表示範圍中心在圖高百分之幾的位置
- r 如果圖形寬、高相等則範圍為圓,r代表範圍圓半俓除以圖形寬或高;如果圖形寬、高不相等則範圍為橢圓,r代表範圍橢圓的長短軸半長除以圖形寬或高;注意:r為50%,範圍圓直徑恰等於圖的寬或高。
- 設色中心:由 fx,fy 兩個屬性決定的位置,就是設色為 0% 的地方,兩個屬性都以百分比表示
- fx表示設色中心在圖寬百分之幾的位置
- fy表示設色中心在圖高百分之幾的位置
- 設色 100% 的地方在範圍圓或範圍橢圓的圓周上
- 設色標籤 stop,漸層標籤包住數個 stop 標籤,每種顏色通過一個 stop 標籤來規定。
- offset屬性用來定義漸層的開始和結束位置,其 100% 是指整個漸層範圍。
- stop-color 屬性用來定義顏色,也可以做為 style 的樣式。
- stop-opacity 屬性決定透明度,也可以做為 style 的樣式。
- 以 ball3.svg 為例:漸層範圍為整個圓,因為 cx,cy,r 都是 50% ,而設色中心在中間下方,因為 fx='50%' fy='100%' ,此處是 stop 設為 0% 的顏色(白色),而範圍圓週邊是 stop 設為 100% 的顏色(黑色)
- 漸層範圍:由 cx,cy,r 三個屬性決定,三個屬性都以百分比表示,漸層範圍是一個圓或橢圓
- 作圖練習五:以 SVG 放射漸層作出此圖:
 ,圓半徑 75px 。
(六)柔焦濾鏡
- 範例六(sun.svg)原始碼:
<?xml version='1.0' encoding='UTF-8' standalone='no'?>
<svg xmlns='http://www.w3.org/2000/svg' version='1.1' width='160' height='160'>
<defs>
	<radialGradient id='r4' cx='50%' cy='50%' r='50%' >
		<stop style='stop-color:#fff100' offset='0%' />
		<stop style='stop-color:#ff9900;stop-opacity:.98' offset='50%' />
		<stop style='stop-color:#ff1700;stop-opacity:.98' offset='100%' />
	</radialGradient>
	<filter id='f1' >
		<feGaussianBlur stdDeviation='3' />
	</filter>
</defs>
<circle cx='79' cy='79' r='75' style="fill:url(#r4);filter:url(#f1);" />
</svg>
- 濾鏡標籤 filter 語法說明:
- 其中的 id 屬性定出濾鏡名稱
- 也可以設 width,height,x,y 去定濾鏡範圍和起點,如沒設以整個圖形為範圍。
- 高斯模糊濾鏡 feGaussianBlur :濾鏡標籤包住數種不同效果的濾鏡,高斯模糊濾鏡是最簡單的濾鏡。
- 高斯模糊濾鏡主要只有一個參數:stdDeviation(標準差),用來控制模糊的程度,數字越大越模糊,數字為零則是圖片原本的狀態。
- 作圖練習六-1:加日。請到 jendo.org/~thisNasAdmin/waterfall1.svg 複製原始碼到自己的www裡,將夕陽放到瀑布(waterfall1.svg)圖裡適當的位置,如右圖:
 ,山要蓋住一部分柔焦的太陽。
- 作圖練習六-2:加天。以 SVG 漸層,柔焦作出夕陽圖如右圖:
 ,天用矩形做,天的顏色是下紫紅上藍,夕陽天色剛好在山的輪廓線之上。檔名叫做 waterfall2.svg 。
- 作圖練習六-3:加草地。以 SVG 漸層,柔焦作出夕陽圖如右圖:
 加入綠草地,是矩形,與天、山的左緣相接。檔名叫做 waterfall3.svg 。
2017.11.21
path
| 指令 | 參數 | 示例 | 指令說明 | |
|---|---|---|---|---|
| M(move to) | x y | <path d='M0 0' style='stroke:black'/> | 起始點的 x , y 座標 | |
| 線 | H(horizontal line to) | x | <path d='M0 0 H50' style='stroke:black'/> | 從目前點的座標畫水平直線到指定的 x 軸座標 |
| V(vertical line to) | y | <path d='M0 0 V50' style='stroke:black'/> | 從目前點的座標畫垂直線到指定的 y 軸座標 | |
| L(line to) | x y | <path d='M0 0 L50 50' style='stroke:black'/> | 從目前點的座標畫直線到指定點的 x , y 座標 | |
| 二 次 |
Q(quadratic Bézier curve) | x1 y1 x y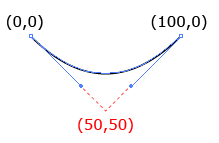 <path d='M0,0 Q50,50 100,0' style='stroke:black'/> |
從目前點的座標畫條二次貝茲曲線到指定點的 x, y 座標:其中 x1, y1 為控制點 | |
| T(smooth quadratic Bézier curve) | x y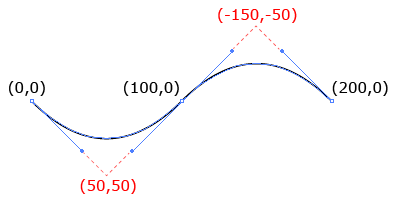 <path d='M0,0 Q50,50 100,0 T200,0' style='stroke:black'/> |
前方要接上 Q 才能畫,從目前點以前一個 Q 的控制點之鏡射點為控制點,畫二次貝茲曲線到指定點(x,y)。 | ||
| A(Arc) | rx ry x-axis-rotation large-arc-flag sweep-flag x y | 從目前點的座標畫個橢圓弧到指定點的 x, y 座標:其中 rx, ry 為橢圓形的 x 軸及 y 軸的半徑,x-axis-rotation 是弧線與 x 軸的旋轉角度,large-arc-flag 則設定 1 最大角度的弧線或是 0 最小角度的弧線,sweep-flag 設定方向為 1 順時針方向或 0 逆時針方向 小寫 a 與大寫 A 的區別只在於: a 最後的 x,y 是相對於目前點的相對座標 |
||
| 三 次 |
C(curve) | x1 y1 x2 y2 x y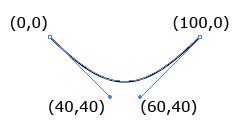 <path d='M0,0 C40,40 60,40 100,0' style='stroke:black'/> |
從目前點的座標畫條三次貝茲曲線到指定點的 x, y 座標:其中 x1, y1 及 x2, y2 為控制點 | |
| S(smooth curve) | x2 y2 x y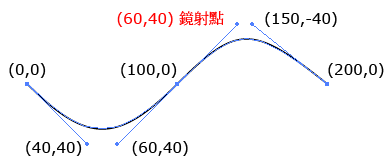 <path d='M0,0 C40,40 60,40 100,0 S150,-40 200,0' style='stroke:black'/> |
在目前點之前必須有一個貝茲控制點,在目前點之後會以同樣的斜率鏡射一個貝茲控制點,再由參數(x2,y2)補上第二個貝茲控制點,再從目前點經兩個貝茲控制點畫貝茲曲線到指定點(x,y)。 | ||
| Z(closepath) |  <path d='M0,0 Q50,50 100,0 T200,0 Z' style='stroke:black'/> |
關閉路徑,將目前點的座標與第一個點的座標連接起來 | ||
(一)一次圖形(相對表示)
- 以 m 或 l 連續處理皆可
- 每一節放一個「下個點」,
<path d='m0,51 50,50 50,-50 50,-50 50,50 50,50 50,-50 50,-50 50,50 50,50 50,-50 50,-50 50,50' style='stroke:black;fill:none;'/>
<path d='m0,51 l 50,50 50,-50 50,-50 50,50 50,50 50,-50 50,-50 50,50 50,50 50,-50 50,-50 50,50' style='stroke:black;fill:none;'/>
(二)二次圖形(相對表示)
- 以 q 或 q,t 連續處理皆可
- q 每一小節放兩個點:「控制點 下個節點」,兩點同座標系,皆參考上個節點。
- q,t 的 t 每一小節放一個點:「下個節點」,控制點省略,省略的控制點為上一小節控制點對上個節點的鏡像點。
以 q 表示
<path d='m0,51 q50,50 100,0 50,-50 100,0 50,50 100,0 50,-50 100,0 50,50 100,0 50,-50 100,0' style='stroke:black;fill:none;'/>
以 q,t 表示
<path d='m0,51 q50,50 100,0 t100,0 100,0 100,0 100,0 100,0' style='stroke:black;fill:none;'/>
(三)三次圖形(相對表示)
- 以 c 或 c,s 連續處理皆可
- c 每一小節放三個點:「控制點1 控制點2 下個節點」,三點同座標系,皆參考上個點。
- c,s 的 s 每一小節放兩個點:「控制點2 下個節點」,控制點1省略,省略的控制點1為上一小節控制點2對上個節點的鏡像點。
例一
以 c 表示
<path d='m0,51 c40,40 60,40 100,0 40,-40 60,-40 100,0 40,40 60,40 100,0 40,-40 60,-40 100,0 40,40 60,40 100,0 40,-40 60,-40 100,0' style='stroke:black;fill:none;'/>
以 c,s 表示
<path d='m0,51 c40,40 60,40 100,0 s60,-40 100,0 60,40 100,0 60,-40 100,0 60,40 100,0 60,-40 100,0' style='stroke:black;fill:none;'/>
例二
- 以下心形由四段三次貝茲曲線組成,每段皆含三點:兩個控制點、一個下一節點。
- AB 段以 P1,P2 為控制點, B 為下一節點,三個點座標參照 A 點。
- BC 段以 Q1,Q2 為控制點, C 為下一節點,三個點座標參照 B 點。 Q2 和 C點重合。
- CD 段以 R1,R2 為控制點, D 為下一節點,三個點座標參照 C 點。 R1 和 C點重合。
- DA 段以 S1,S2 為控制點, A 為下一節點,三個點座標參照 D 點。
- P2 、 B 、Q1 三點共線,所以 AB 段才能和 BC 平滑銜接。
- R2 、 D 、S1 三點共線,所以 CD 段才能和 DA 平滑銜接。
- C 點和 Q2 、 R1 重合,所以 BC 段和 CD 段,兩節點間有一個控制點和節點重合。但並不是退回到二次貝茲曲線,只是近似二次貝茲曲線而已。
- 由於 Q2 、 C 、 R1 重合, Q2 、 R1 以 C 點鏡像,所以可以將後面的小節(CD段)改以 s 表達。
<path fill='#f00' d='m 12.7,38.5 c -21.3,-11.2 -14.3,-38.5 9.7,-38.5 30,0 51,38.5 51,38.5 0,0 -21,38.5 -51,38.5 -24,0 -31,-27.4 -9.7,-38.5 z'/>
由於 Q2 、 C 、 R1 重合, Q2 、 R1 以 C 點鏡像,所以可以將後面的小節(CD段)改以 s 表達:
<path fill='#f00' d='m12.7,38.5 c-21.3,-11.2 -14.3,-38.5 9.7,-38.5 c30,0 51,38.5 51,38.5 s-21,38.5 -51,38.5 c-24,0 -31,-27.4 -9.7,-38.5z'/>
將紅心的尖部換成 q ,會使紅心尖部顯得略胖,但非常近似原來的紅心:
<path fill='#f00' d='m 12.7,38.5 c -21.3,-11.2 -14.3,-38.5 9.7,-38.5 q 30,0 51,38.5 -21,38.5 -51,38.5 c -24,0 -31,-27.4 -9.7,-38.5 z'/>
比較原來的紅心和紅心的尖部換成 q (綠色部分):
貝茲曲線
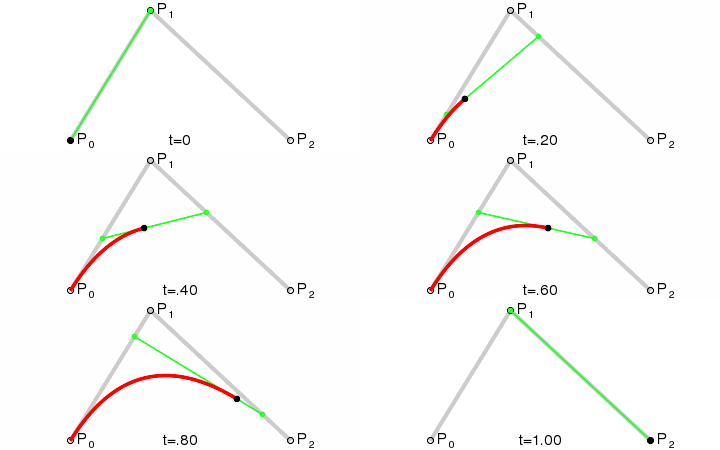
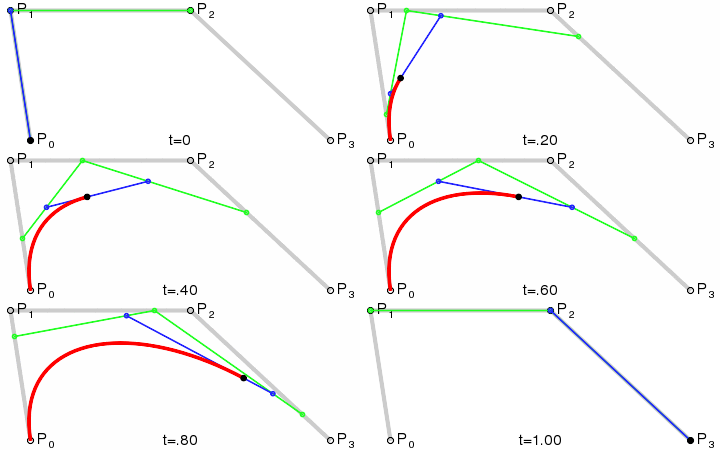
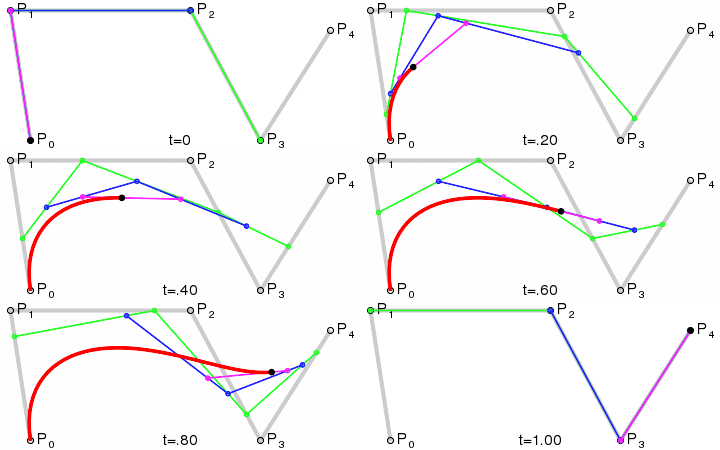
用參數(0~1)和控制點作圖:
- 一次:

- 二次:
- 三次:
- 四次:
- 五次:

path示範
path練習
- path01.svg 鋸子
- path02.svg 二次貝茲波浪
- path03.svg 三次貝茲波浪
- path04.svg 循跡字串
- path05.svg 簡易動畫
同學作業
- 張又懿:path01.svg,path02.svg,path03.svg,path04.svg,path05.svg
- 柯智懷:path01.svg,path02.svg,path03.svg,path04.svg,path05.svg
- 李彥廷:path01.svg,path02.svg,path03.svg,path04.svg,path05.svg
- 盧星瑜:path01.svg,path02.svg,path03.svg,path04.svg,path05.svg
- 張鈞祺:path01.svg,path02.svg,path03.svg,path04.svg,path05.svg
- 蕭卉均:path01.svg,path02.svg,path03.svg,path04.svg,path05.svg
動畫
詳細語法請參考:
- 初探 SMIL Animation
- 深入理解 SMIL Animation
- SVG 動畫示例
- 在「循跡運動」中,如果我們用 path 來表達移動路徑,則圖形的 0,0 其實是 path 開頭 M 所指示的位置,所以須以此關係來決定圖形的 x,y ,才能得到真正想要的運動軌跡。通常圖形的 x 會設為 0 , y 會設定為 ±圖形的高度 。
四標籤:
- set(開關)
- 只用attributeName,to,begin三屬性
- animate(屬性連續改變)
- animateTransform(平移,旋轉,縮放)
- animateMotion(循跡運動)
- 共通語法:將母圖形分拆成開始和結束兩標籤,中間插入動畫標籤。
- 共通屬性:
- attributeName:
- set,animate為某一個母圖形的屬性。from 和 to 就是這個屬性的值將由多少變到多少。
- animateTransform為'transform'另搭配 type 屬性
- animateMotion免設此屬性
- type屬性之值(animateTransform專用):
- rotate旋轉,影響屬性from='起始角度,旋轉軸心x座標,旋轉軸心y座標'、to='結束角度,旋轉軸心x座標,旋轉軸心y座標'。
- scale縮放,影響屬性from='x起始倍率,y起始倍率'、to='x結束倍率,y結束倍率',倍率是自左上原點開始算,如果同組x,y倍率相同,可以只寫一個值。
- translate平移,影響屬性from='起始原點x座標,起始原點y座標'、to='結束原點x座標,結束原點y座標'。
- skewX X軸不動,X軸下方向右歪斜,影響屬性from='起始歪斜角度'、to='結束歪斜角度'
- skewY Y軸不動,Y軸右方向下歪斜,影響屬性from='起始歪斜角度'、to='結束歪斜角度'
- begin='幾s':幾秒開始跑,通常設為 0s 。
- dur='幾s':跑一輪要幾秒,可以設為 indefinite 。
- repeatCount='幾':要跑幾輪,indefinite代表無限多輪,預設值為1。
- from 開始狀態(animate,animateTransform有)。
- to 結束狀態(set,animate,animateTransform有)。
- path(animateMotion專用) 屬性為移動路徑:由 m 開始
- rotate='auto'(animateMotion專用) 圖形隨路徑曲度而轉折。
- attributeName:
2017.11.28
inkscape(一)
- 0.92.4 下載連結
- 32 位元:安裝版 | 免安裝版 (可攜式)
64 位元:安裝版
- 查明自己的電腦是 64 位元版,還是 32 位元版。
- 下載對應的免安裝版。
- 解壓縮。
- 32 位元:安裝版 | 免安裝版 (可攜式)
- 學習資源:
- 素材:
- 介紹 .org 跟 .com 的差別,open source 和商業軟體的差別。
- 介紹 openclipart.org
- 介紹 freepik.com 上面有很多 ai 檔,選「Vector/animals」,再選第一個圖,下載解壓縮。
- 下載 ai 檔,解散群組,取出猴子。
- 調整紙張,匯出點陣圖
- 作業一:找一隻動物,用 A4 紙彩印出來。
- 作業二:畫出一個矩形、一個弧、一個星形或多邊形。
- 作業三:畫出
- 工具箱:

- 1:物件選用(F1)
- 2:路徑/節點(F2)
- 3:拉近/拉遠(F3)
- 4:矩形和正方形(F4)
- 5:圓/弧(F5)
- 6:星型/多邊形
- 7:螺旋(F9)
- 8:自由行手繪線(F6)
- 9:貝茲線/直線
- 10:書法字畫線
- 11:文字(F8)
- 12:創建一個新的連接器
- 13:創建和編輯漸變
- 14:吸管(F7)
- 命令欄:

- 1:創建一個新文檔
- 2:打開現有的文件
- 3:保存文件
- 4:打印文件
- 5/6:匯入/匯出
- 7/8:復原/取消復原
- 9:複製到剪貼板
- 10:剪切到剪貼板
- 11:從剪貼板粘貼
- 12:放大以適應物體
- 13:根據窗口寬度進行縮放
- 14:縮放以適應頁面
- 15:重複的對象
- 16:創建一個對象的庫侖
- 17:取消原鏈接
- 18:分組選定的對象
- 19:取消選擇組
- 20:填充與邊框對話框
- 21:文本字體對話框
- 22:XML編輯器
- 23:排列/放置對話框
- 24:Inkscape設置
- 25:文檔設置
2017.12.5
inkscape(二)操作要領
- 選單:工具盒(左)、命令欄(上)、選單圖示(右)、即時提示訊息(下),物件參數(上)、對話框
- 滑鼠:
- 確認你的操作工具

- 點1下(奇數) vs 點2下(偶數)
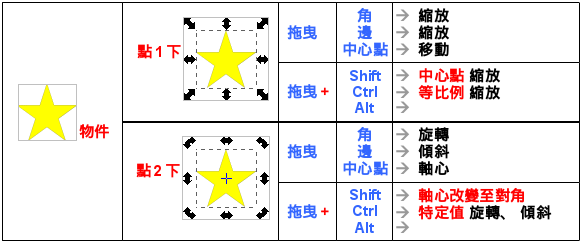
- 確認你的操作工具
- 鍵盤
| 指法 | 作用 |
|---|---|
| Del | 刪除物件 |
| Home | 物件升到最上層 |
| End | 物件降到最下層 |
| Page-Up | 物件升到上一層 |
| Page-Down | 物件降到下一層 |
| Alt + 滑鼠點擊 | 在不同層的物件中跳動 |
| Ctrl + B | 顯/隱捲動條 |
| Ctrl + 方向鍵 | 垂直/水平捲動畫布 |
| Ctrl中鍵滾輪 | 拉近、拉遠 |
| Shift中鍵滾輪 | 水平捲動畫布 |
| Ctrl右鍵 | 拉近 |
| Shift右鍵 | 拉遠 |
| Ctrl + N | 建新檔 |
| Ctrl + O | 開舊檔 |
| Alt + Tab | 檔案間切換 |
| Ctrl + Z | 回復上一步 |
| Ctrl + Shift + Z | 重做你上一個動作 |
| F1~F9 | 工具箱中九個工具 |
| F10 | 打開選單 |
| F11 | 收放全螢幕 |
| F12 | 收放對話框 |
| Ctrl + Shift + F | 叫用Fill and Stroke對話框 |
| Ctrl + Shift + A | 叫用「對齊」對話框 |
| 選物 + 方向鍵 | 移動2個像素(用Shift快10倍) |
| 選物 + Alt + 方向鍵 | 移動1個像素 |
| 選物 + <和> | 中心點縮(50%)放(200%) |
| 選物 + Alt + <和> | 微縮放 |
| 選物 + [和] | 旋轉15度(加Ctrl一次轉90度) |
| 選物 + Alt + [和] | 微旋轉 |
| Shift + 滑鼠點擊 | 選擇/排除選擇(配合範圍選擇)好幾個物件 |
| Esc | 取消全部選擇 |
| Ctrl + A | 選擇本圖層所有物件 |
| Ctrl + G | 建立群組 |
| Ctrl + U | 解散群組 |
| Ctrl + Shift + G | 解散群組 |
| Ctrl + 滑鼠點擊 | 選用群組中的物件加以編輯 |
| Ctrl + Shift + 滑鼠點擊 | 選用群組中的多個物件加以編輯 |
| Ctrl+F1 | 漸層工具 |
| F7 | 吸管 |
| Ctrl + D | 複製 |
- 作業四:記事本
- 作業五:Lesson-2.svg中的變形,任選一至二個圖形
2017.12.12
GIS(一)
GIS (Geographic Information System,地理資訊系統),是指在地圖上加上數據或訊息。
概述
- 使用地圖庫:
- google map:google釋出的地圖庫,公布了API使得用戶能夠建立自訂的應用。公開格式,但非公共版權內容。
- OpenStreetMap:(開放街圖,簡稱OSM),於2004年由英國的 Steve Coast 發起,採用類似 Wiki 的協作編輯以及開放的授權與格式。
- GIS 相關單字。
- zoom:放大或縮小畫面
- overlay:覆蓋物,GIS中用複數overlays
- marker:標記,GIS中代表地點標示,用複數markers
- address:地址
- latitude:緯度
- longitude:經度
- coord:經緯度座標,GIS中代表地點標示,用複數coords
- map:地圖
- type:類別
- road:道路
- color:顏色
- fill:填滿
- radius:半徑
- html:超文件
- content:內容
- popup:跳出
- false:假的,不成立
- true:真的,成立
- polyline:多點成線
- polygon:多邊形
- circle:圓形
- rectangle:方形(矩形)
- ROADMAP:道路地圖
- SATELLITE:衛星空照圖
- HYBRID:道路與空照圖相疊加。
- TERRAIN:地形圖
- 初階應用,大槪分為 markers (標點), overlays (標區域),使用的語法是 javascript 。
- 範例:
- 基本 DIV
<meta content='text/html;charset=utf-8' http-equiv='Content-Type'>
<script type='text/javascript' src='http://maps.google.com/maps/api/js?sensor=false'></script>
<script type='text/javascript' src='http://ajax.googleapis.com/ajax/libs/jquery/2.2.4/jquery.min.js'></script>
<script type='text/javascript' src='http://www.pittss.lv/jquery/gomap/js/jquery.gomap-1.3.3.min.js'></script>
<script>
$(function(){
	$('#map').goMap({
………
	});
});
</script>
<div align=center id='map' style='height:550px; width:900px;'>六年制學程</div>
括號、引號必須成對
- 所有字和符號都用「英數」、「半形」符號,不可以用全形符號。
- 所有的小括號、中括號、大括號、單引號、雙引號都要成對。
- 每一對大括號代表一個東西(物件),東西裡面可以包進去更小的東西,東西不一定要取名字。例如:
- 一張地圖。
- 一個覆蓋物。
- 一個經緯度座標點。
- 一個地點標示。
- 一個html指示。
- 每一對中括號裡面包一群相同的東西。例如:
- 一群 marker 包成一組,名字叫 markers ;
- 一群 overlay 包成一組,名字叫 overlays ;
- 一群 coord(經緯度座標)包成一組,名字叫 coords 。
- 每一對小括號中代表「函式」要作用的對象,現在先不必記它。
整張圖的性質
- 調整比例尺的性質:zoom:1~20。1比例尺最大,20比例尺最小。
- 標定整張地圖中心點位置的性質:
- latitude:緯度,十進位。
- longitude:經度,十進位。
- address:地址。如:以色列。
- 地圖種類:maptype:值加引號有四種選擇:
- ROADMAP:道路地圖
- SATELLITE:衛星空照圖
- HYBRID:道路與空照圖相疊加。
- TERRAIN:地形圖
- markers:各個地點標示
- overlays:各個覆蓋物
標點
- 性質的名稱和性質的「值」用「:」連接。
- 同一級或同一組的東西並列時,用「,」分開,但是最後一個性質或東西後面不可以加「,」,因為後面沒有東西了。
- HTML 中的樣式語法有點像 GIS 中性質語法,但前者是用「;」間隔開兩組樣式,後者是用「,」間隔開兩組性質或東西。
取得經緯度的方法
- android 上面必須使用 chrome 瀏覽器,不能使用預設瀏覽器。也不能使用地圖 app 。
- 地圖上某一點按久一點,模擬滑鼠右鍵,出現下拉式選單,按下「這裡有什麼?」
- 網址使用 maps.google.com.tw?ui=maps 得到 ms 介面。
- ms介面可以到「地圖研究室」啟動「經緯標記」。
- 長按地圖上一點,會跳出選單。選「標記經緯度」,可以標示經緯度。但標示點會偏,需要修正。
- PC板只要使用滑鼠,而且不限瀏覽器。
- 在要找的點,點擊滑鼠左鍵。就會出現該點的地址及經緯度。
- 網址列如打出:「https://www.google.com.tw/maps/@25.0246702,121.4566057,16z」可以指示圖中心點的經緯度及zoom的等級。
作業
- 去抄標點無連結的原始碼回來,改成你家附近的地標。
- 為上述地標找到介紹頁。
- 將介紹頁的連結加到你的地標上。(參考標點加連結)
- 將圖示改成你找的小圖, svg,png,jpg,gif 皆可。
- 增加第二個地標。
2017.12.19
GIS(二)
markers內參數
- 整個markers:後面用一個中括號把所有的點包起來。中括號裡面,每一組大括號是一個點。
- 第一個 marker 為整張圖的中心點,優先於整張圖的中心點。
- 每一個點內,諸參數如下:
- address:值為字串,故加引號,可用國名如「台灣」或地址如「台灣新北市三峽區三樹路2號」
- longitude:經度,十進位。如:121.459502
- latitude:緯度,十進位。如:25.025448
- html:放物件,內含:
- content:HTML碼
- popup:false不主動彈出;true主動彈出。
- title:游標停住會顯示。
- draggable:true代表可拖動。
- icon:字串,代表圖檔。
overlays內參數
每一個覆蓋物用大括號包起來,所有的覆蓋物用中括號包起來。
每一個覆蓋物共有的性質有:type、color、fillColor。
四種覆蓋物各自的參數:
- circle 圓:latitude、longitude、radius
- polyline 線:coords
- polygon 多邊形:coords
- rectangle 方形(矩形):ne、sw
作業
- 將範例程式的圖中心點,改成自己家,路線圖改在自己家附近,圓圈圈住自己家。
- 做新的檔案,目標對準以色列,並用圓圈圈住死海。
- 在上一個檔案中,加入耶路撒冷、海法、台拉維夫三個城市的「地點標示」,點擊地點標示時,跳出連結,可以連向維基百科的介紹頁。
- 自訂主題,運用 GIS 幫助自己進行主題的說明與表達。
2017.12.26
GIS(三)
google 我的地圖
- 進入方法:
- https://www.google.com/maps/d/ 或 https://www.google.com/maps/d/?hl=zh-TW
- 「google 地圖選單/我的地點/地圖/建立地圖」
- 一圖多層:
- 觀摩丁丁的我的地圖
- 操作講義
- 存成 kml 檔
- 別人分享出來的地圖,以台北郊山地圖
中文參數說明
英文參數說明 - 每一組參數與另一組參數用「&」相連
- mid=xxxxxxxxxx,如「216006515222070930637.0004ccf5b0fba2ca5b9e6」代表:「登山 - 台北郊山景點地圖」。
- hl=zh-TW,主機語言(host language)
- ll=緯度,經度,地圖中心點經緯度(latitude,longitude)。
- z=縮放級數(zoom),值範圍1~20。1比例尺最大,20比例尺最小。
-----其他參數----- - ie=UTF8:指定輸入的字符編碼(input encode)。
- oe=UTF8:指定輸出的字符編碼(output encode)。
- t=h:地圖類型(type)。m為常規地圖,k為衛星地圖,h為混合地圖,p為地形地圖,e為GoogleEarth。
- spn=0.00681,0.00912:大致的區域。如果沒有指縮放參數z=,那麼將調整縮放水平到一個合理的數值。
- source=embed:原始碼嵌入。
- dg=feature:自動產生,不必下命令。
結合「我的地圖」與 GIS
- GIS←kml←google 我的地圖
- 什麼是 kml
- 將 kml 中的經緯度,換成 GIS
- 將經緯度段落複製到一個新檔。
- 將經緯度前的空白換成四個 tab
- 將「,0\n」置換成「}\n」
- 將「\t\t\t\t」置換成「\t\t\t\t{longitude:」
- 將「,」置換成「,latitude:」
- 將「}」置換成「},」
- 置換後的經緯度座標,嵌入 GIS 的 polyline 裡的 coords:[]性質中。
2018.1.2
圖形計算機(一)
- 製作 svgdraw.php
- 抄原始碼(utf-8)
- 在每個同學的 www 之下建 svg ,之下建 svgdraw.php ,內容抄上面。
- 檔名自己取,副檔名用 php ,基本內容:
<?php
require_once("./svgdraw.php");
$draw = new svgdraw;
…
$drawResult=$draw->draw();
echo $drawResult['svg'];
?>
- 基本圖紙:
- 圖寬:$draw->W,預設601。
- 圖高:$draw->H,預設401。
- 原點距左上角:$draw->x0,$draw->y0,預設(200,200)。
- x每單位幾點:$draw->xu,預設15。
- y每單位幾點:$draw->yu,預設15。
- x每幾單位畫一個刻度:$draw->xGraduate,預設1。
- y每幾單位畫一個刻度:$draw->yGraduate,預設1。
- x每幾刻度標示一數字:$draw->xScale,預設1。
- y每幾刻度標示一數字:$draw->yScale,預設1。
- 秀出直角座標系:$draw->coordinate,預設1。
- 函式描點密度:$draw->pointDensity,預設20。
- 函式取樣點:$draw->xs,預設'-1;0;1';
- 基本圖:$draw->圖形[]=array(array(…),其他屬性);
- 多邊形:$draw->polygons[]=array('points'=>array(array(×,×),array(×,×),array(×,×)),'width'=>'線寬');
- 線段:$draw->lineSegments[]=array(array(×,×),array(×,×),'color'=>'顏色','dash'=>'5 5');
- 字:$draw->alnums[]=array(array(×,×),'word'=>'字');
- 圓:$draw->circles[]=array(array(×,×),'radius'=>半徑,'fill'=>'顏色','fill-opacity'=>'1');,預設半徑3。
- 楕圓:$draw->ellipses[]=array(array(×,×),'rx'=>x半軸,'ry'=>y半軸,'color'=>'顏色');
- 弧:$draw->arcs[]=array(array(×,×),array(×,×),'rx'=>x半軸,'ry'=>y半軸,'color'=>'顏色','arrowEnd'=>1);
- 作業:
- demo00.php 移動原點及尺寸
- demo01.php 三線段
- demo02.php 去直角座標
- demo02.svg 取原始碼
- demo03.php 45,45,90直角三角形,用polygons
- demo03.svg 取原始碼
- demo04.php 對上面的三角形加入 A,B,C 三頂點
- demo04.svg 取原始碼
- inner.php 做三角形重心
- inner.svg 取原始碼
- demo2.php
<?php
require_once("./svgdraw.php");
$draw = new svgdraw;
$draw->W=401;
$draw->functions[]=array('functionName'=>'polynomialEquation','argument'=>array(-3,4,2),'color'=>'red');
$draw->ellipses[]=array(array(2,2),'rx'=>5,'ry'=>3,'color'=>'blue');
$draw->arcs[]=array(array(3,3),array(5,3),'rx'=>5,'ry'=>5,'color'=>'green','arrowEnd'=>1);
#$draw->coordinate=0;
$drawResult=$draw->draw();
echo $drawResult['svg'];
?>
2018.1.9
圖形計算機(二)
- demo3.php,同學自己做出來,不公布答案
- 多項式:
- 基本:
$draw->functions[]=array('functionName'=>'polynomialEquation','argument'=>array(×,×,×,…),'color'=>'red'); - $draw->xs='×;×;×;…';:各點 x 值。
- 標y值:在functions[]中加'xToy'=>$draw->xs,
- 標點:在functions[]中加'x2y'=>$draw->xs,
- 斜率:在functions[]中加'tangentPoint'=>$draw->xs,
- 面積:在functions[]中加'area'=>$draw->xs,
- 基本:
- 互動式圖形計算機
- google圖形計算機